• Hey Guest. Check out your NeoGAF Wrapped 2025 results here!

Nameplates for Pelican System Selector

So I've got a Pelican Universal System Selector Pro, one of these:
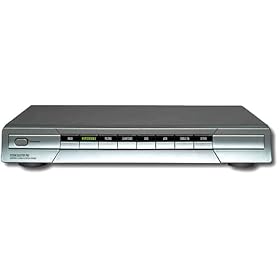
b72f92c008a09907e35f2010._AA280_.L.jpg

http://www.amazon.com/gp/product/B0001GAYUE/?tag=neogaf0e-20

Mine's black but it's the same thing. Anyway, it comes with eight system nameplates, labels like "PlayStation 2," "GameCube," "Xbox," etc. However, those are the only three nameplates that correspond to systems I own. I also have a Dreamcast, Genesis, SNES, and Xbox 360 hooked into this thing, and it sucks labeling them "Nintendo 64" or "PlayStation" since I don't have the proper nameplates. Anyone know of anywhere to order more of these nameplates, or have any methods as to how to make more? I was hoping you could just print out new labels and slide them in there, but the ink seems to be printed directly on the plastic. Any ideas?
 
I have two of these, and here's what I did: take them out and pry off the transparent covers. Then scrape the paint off the back part with a razor blade or knife by holding the blade perpendicular to the nameplate and rubbing back and forth. Don't try to hold it parallel and slice off the paint, you'll just end up ruining it or cutting yourself.

Then, print new labels, put them into the covers and reattach (no glue or anything needed, they stay on fine. Ones printed on white paper actually look better than the originals, because you can see what they say even when they're not lit, but it's still obvious which one is selected. I printed paper ones for every slot so they all look the same.
 
Leondexter said:
I have two of these, and here's what I did: take them out and pry off the transparent covers. Then scrape the paint off the back part with a razor blade or knife by holding the blade perpendicular to the nameplate and rubbing back and forth. Don't try to hold it parallela and slice off the paint, you'll just end up ruining it or cutting yourself.

Then, print new labels, put them into the covers and reattach (no glue or anything needed, they stay on fine. Ones printed on white paper actually look better than the originals, because you can see what they say even when they're not lit, but it's still obvious which one is selected. I printed paper ones for every slot so they all look the same.

Good call, thanks!
 
shuri said:
How's the quality on that thing?
It's great, I love it. I've had it for a few years and it's done everything I've needed. Unfortunately, in the last few weeks after performing flawlessly since purchase, one of the audio channels on one of the inputs seems to have given out. I haven't had any time for video games lately and I haven't tested it extensively to be sure, but I'm pretty certain that's what's happened. Kind of frustrating, but it still leaves 7 fully working inputs.

One nice thing is that every input has component, s-video, and composite. Three of them also have optical audio and ethernet.
 
I've had one of these forever and have yet to hook the thing up... maybe this coming generation (Xbox and GC are downstairs in extra bedroom only PS2 is upstairs in living rm).
 
Leondexter said:
I have two of these, and here's what I did: take them out and pry off the transparent covers. Then scrape the paint off the back part with a razor blade or knife by holding the blade perpendicular to the nameplate and rubbing back and forth. Don't try to hold it parallel and slice off the paint, you'll just end up ruining it or cutting yourself.

Then, print new labels, put them into the covers and reattach (no glue or anything needed, they stay on fine. Ones printed on white paper actually look better than the originals, because you can see what they say even when they're not lit, but it's still obvious which one is selected. I printed paper ones for every slot so they all look the same.

Thanks again, I've been doing this. It's great because I've been finding the actual system logos online, converting them to black/white line art, and printing them out. They look even better than the originals!
 
Chris Remo said:
Thanks again, I've been doing this. It's great because I've been finding the actual system logos online, converting them to black/white line art, and printing them out. They look even better than the originals!

Whoa...that's awesome! Mine are just some regular font squished to fit the area. Now I'm thinking of doing what you're doing. Thanks right back at you!
 
I was thinking the same thing! I love mine and it really is rewarding to have 480p running without a problem along with the ethernet connections. I have yet to try the dolby features. I'm going to try getting the names written on there.
 
Yeah, the difference is 8 component inputs, 3 of which have optical audio.

I wish Pelican would just sell a Wii, 360 and PS3 label on their website. I would totally buy it.
 
does it has any of those bizzaro bandwidth issues that some of those selectors have with hd content? I remember reading reviews of a few of those 'hdtv' switches, and some of them had problems with red colors (or was it blue) not being displayed sometimes.
 
Here are the images I made. These took freaking forever because I traced over them and was frequently working from crappy source images. I'm sure there'd be a better way to do it but I'm not a graphic designer. :P

snes.gif


genesis.gif


ps2.gif


gcn.gif


xbox.gif


x360.gif


Unfortunately I forgot to save the Dreamcast one, but fortunately that was the easiest by far. Since the Dreamcast logo (minus the swirl) is just black text over white, all you have to do is crop and invert it.

All of these images are the correct size to fit inside the nameplates. Just print them out at 300dpi and they'll be exact.
 
UncleScr00ge said:
Yeah, the difference is 8 component inputs, 3 of which have optical audio.
3 ethernet ports too.

edit - it's a great selector to have if you're one of those 3 current-gen systems (480p) + snes/gen/nes, etc. + a progessivescan dvd player.
 
Dreamcast.gif


DVD.gif


PS1.gif


PS2.gif


CD-I.gif


Like how I saved the best for last? :lol

I haven't tried printing any yet but these should work :D
 
Beatbox said:
Like how I saved the best for last? :lol

I haven't tried printing any yet but these should work :D
Haha, nice. Let me know how the Dreamcast swirl, PS2 gradient, and CDI logo turn out. I tended to steer clear of blends, very thin lines, etc., because I didn't know if they would be readable enough.
 
My only complaints:

-Only 3 Optical Inputs (still fantastic though, considering the price) I need 4 (360, PS2, DVD, Satilite). PS2 rarely uses it to its full extent, so I just used it with analog.
-It does not seem to deal with powerloss very well. I have to unplug it and plug it back in if I lost power. Otherwise, it won't let me switch.

Fantastic otherwise

Would have been ultimate if also acted as a switch for ethernet, and not just a switch :D
 
Thanks Alot, I got the cheapo 20 dollar, 4 input one, but the plates look to be the same, clear, with that white paint and they clip on the sides? I got my 360 listed as an Xbox and my Xbox as a "game system" they can't be happy about that:)

 
Leondexter said:
I have two of these, and here's what I did: take them out and pry off the transparent covers. Then scrape the paint off the back part with a razor blade or knife by holding the blade perpendicular to the nameplate and rubbing back and forth. Don't try to hold it parallel and slice off the paint, you'll just end up ruining it or cutting yourself.

Then, print new labels, put them into the covers and reattach (no glue or anything needed, they stay on fine. Ones printed on white paper actually look better than the originals, because you can see what they say even when they're not lit, but it's still obvious which one is selected. I printed paper ones for every slot so they all look the same.

How in the world did you get the covers off? I can't get it remove the black piece from the white, I'm afraid if I force it the white piece will snap.
 
The Joytech component video switchboxes are now on sale and they actually look pretty sexy. They have a digital display on front to show what input is currently on.

Thank you for the printable logos! I have a PSSP and think it is a pretty damn good unit.
 
PanopticBlue said:
How in the world did you get the covers off? I can't get it remove the black piece from the white, I'm afraid if I force it the white piece will snap.

I just pried them off with a knife. Make sure you're prying along the top edge where the glue is.
 
seriously, get the Psyclone unit. four components/svid/composite/ethernet/optical inputs, remote, fully programmable, backlit LCD. it's solid.
 
JCBossman said:
Thanks Alot, I got the cheapo 20 dollar, 4 input one, but the plates look to be the same, clear, with that white paint and they clip on the sides? I got my 360 listed as an Xbox and my Xbox as a "game system" they can't be happy about that:)

$20? link?
 
Just go into any EB/Gamestop, it's listed under the GAMESTOP brand but its made by Pelican, very nice does Composite/S Video/component along with cat 5 switching, even come with a couple chepo cables, definately worth the 20 bucks
 
i got an older Pelican switcher that is shaped like a PS2 with the PS2 console grooves, i think your labels are cool, especially since for the older consoles
 
Leondexter said:
I just pried them off with a knife. Make sure you're prying along the top edge where the glue is.

What kind of knife? I'm using a razor because it's seems the only thing thin enough, and I'm just tearing it up trying to get it apart :/
 
CRAP!

It's just NOW, right before I post that I realized that Chris Remo had already sized those labels to fit exactly - that all I had to do was print them out at 300dpi! I skimmed his post so quickly that I missed that part!

ARGH!!!!

BTW, how does one set something to print at 300dpi?

Anyway, what I did was take the labels made by Chris Remo and Beatbox, saw that they weren't the right size (too big), and resized them using MS Paint and MS Word. I also did some modifcations for the sake of esthetics and tried to follow Chris Remo's advice about gradients and thin lines

NOTE: I am not a graphic artist. I only know how to use MS Paint. I don't even HAVE Photoshop, let alone know how to do a lot of the more advanced stuff with it!

Here's what I came up with.

Generic Nintendo (used the "NINTENDO" logo in Chris Remo's "NINTENDO GAMECUBE" label):
Nintendo.gif


Genesis (I would've preferred to have been able to use the SEGA Genesis CDX logo since that is the console I use, but the super square dimensions of the logo combined with its thin lines made it unfeasible):
Genesis.gif


Super Nintendo:
SuperNintendo.gif


PlayStation:
PlayStation.gif


Dreamcast (I am comtemplating moving the swirl to the left of the "Dreamcast" logo since that is where it usually appears):
DreamcastSwirlRight.gif


PlayStation 2:
PlayStation2.gif


PS2 (I removed the gradient effect):
PS2withmostofthegradientremoved.gif


Xbox:
XBOX.gif


GameCube (Removed the "Nintedo" part for a cleaner look):
Gamecube.gif


Xbox 360:
XBOX360.gif


PlayStation 3 (I would like to remove that gradient effect and the blurring but that is beyond my abilites in MS Paint):
PlayStation3.gif


Wii:
Wii.gif


DVD (I removed the oval with the word "Video" in it from the logo):
DVD.gif


I am missing labels for the SEGA Saturn and the Nintendo 64. I acquired those logos and got started on trimming, editing, and resizing them. All that's left is to transform them into white text on a black background. Can someone with photoshop and more skills than I please do that?

Here they are:

SEGA Saturn (I think this one is going to be a bitch to work on due to the copious amounts of texture shading, shadows, and gradients):
saturn-1.gif


Nintendo 64 (I started on using MS Paint to make it black and white going pixel by pixel; I did everything but the "O" and the "6" - I couldn't get the "6" to look right so I gave up):
Nintendo64.jpg


Classic Nintendo:
nintendo-logo-1.jpg


I'd greatly appeciate it if someone can make these 3 logos black and white.

As for labels I came up with, here's how you get them to be the right size:

1) Open up MS Word
2) Click on “Insert”
3) Click on “Picture”
4) Click on “From File”
5) Select the label(s) you want to print out
6) Right-click on the label(s)
7) Click on “Format Picture”
8) Click on the “Size” tab
9) Change the width to “1.06” inches
10) That will automatically change the Height to “0.27” inches
11) PRINT!

As long as you trim them EXACTLY along the lines they will fit. The length may be less tham 1mm short, but after the 2 very late nights I spent on them I think they're good enough. =P
 
Leondexter said:
I have two of these, and here's what I did: take them out and pry off the transparent covers. Then scrape the paint off the back part with a razor blade or knife by holding the blade perpendicular to the nameplate and rubbing back and forth. Don't try to hold it parallel and slice off the paint, you'll just end up ruining it or cutting yourself.

Then, print new labels, put them into the covers and reattach (no glue or anything needed, they stay on fine. Ones printed on white paper actually look better than the originals, because you can see what they say even when they're not lit, but it's still obvious which one is selected. I printed paper ones for every slot so they all look the same.
PanopticBlue said:
How in the world did you get the covers off? I can't get it remove the black piece from the white, I'm afraid if I force it the white piece will snap.
Leondexter said:
I just pried them off with a knife. Make sure you're prying along the top edge where the glue is.
PanopticBlue said:
What kind of knife? I'm using a razor because it's seems the only thing thin enough, and I'm just tearing it up trying to get it apart :/

OK, I did what you said. I used two square blade exacto knives, a big one and a smaller one.

So out of the 13 labels, 7 of them came off relatively easily, but the rest just refuse to come off. I am able to pry apart quite a bit of space in the middle but the two opposite ends seem to be glued firmly in place! The even though I alternate between using the blade end of the exacto knife and the dull end, the plastic parts are starting to get damaged from the amount of force I am using - BUT THEY STILL WON'T COME APART!!!

I even tried wedging BOTH of my thumbnails in their and trying to force them apart but to no avail.

What can I do to get these !*#^&%$@!!! stubborn ones to come apart?!
 
Chris Remo said:
Mine has no remote control. I don't believe that version was available when I bought my unit.

Does anyone know if the only difference between the PL957 (Black) and the PL960 (Silver) is the colour?

So I am assuming that the PL960A (Silver) is model # for the one with the remote then.

BTW, Chris, how do I set your labels to be printed in 300dpi?

The PS2 logo (with the gradient effect removed) and the Dreamcast swirl turned out fine on my laser printer.
 
Hyoushi said:
Heh. Well. You could just look for eps versions on Brandsoftheworld.

NICE!

That's a very useful site. It's been a goldmine for logo of some of the more obscure systems.

OK, here are what I so far have been able to come up with in addition to the ones above:

Japanese SEGA Mega Drive:
JapaneseMegaDRIVENOTFINAL.jpg


Turbo Grafx 16 (Given that the logo was squarish, and I had to split the top, middle, and bottom up, I am still trying out different things)

Top and bottom aligned, no 16:
Turbografxtopandbottomlinedup-1.jpg


Top and bottom aligned, small 16:
Turbografx16topandbottomlinedup1-1.jpg


Top and bottom aligned, larger 16:
Turbografx16topandbottomlinedup16is.jpg


Main body of text aligned, no 16 (Damn this one looks bad!):
TubroGrafxbodyoftextislinedup.gif


I am still fiddling around with the Turbo Grafx-16 labels.

Nintendo 64:
Nintendo64.gif


Dreamcast (Several choices to go with the one above)

No swirl:
Dreamcast.gif


Swirl on left (as it normally appears):
DreamcastSwirlLeft.gif


Once again, here are the instructions for printing them out to fit.

1) Open up MS Word
2) Click on “Insert”
3) Click on “Picture”
4) Click on “From File”
5) Select the label you want to print out
6) Right-click on the label
7) Click on “Format Picture”
8) Click on the “Size” tab
9) Change the width to “1.06” inches
10) That will automatically change the Height to “0.27” inches

Repeat for as many labels as you need. I prefer to put them all on the same page.

11) PRINT!

As long as you trim them EXACTLY along the lines they will fit very snugly.
 
Not sure if any of y'all will even see this but just wanted to post on here and say that I recently got a Pelican System Selector Pro off of Ebay for my retro gaming collection and you all were so helpful and amazing for helping me get some much needed labels for mine! This all still works in 2024 and I am very thankful for all of y'all posting all this back in 2006 and 2007 LOL.
 
I have a similar OLD Pelican A/V selector with changeable labels but only 5 inputs. Well Playstation 1 and 2 are really NES and Super Nintendo. I try to just see 1 and 2 lol. Gamecube is usually N64 plugged on the other side. Dreamcast is Dreamcast. Xbox leads nowhere/is extra.
 
I just bought those generic component switchers and the GE branded S-Video switch from Amazon and daisychained them with an S-Video breakout cable since the RetroTink 5X takes S-Video over RCA (blue/green).

I got one of those old punch label makers to label the inputs.
 
Top Bottom