Horse Detective
Why the long case?
I like simple DIY projects, however I have a lot of improving to do. I love making furniture. I built my desk and some shelves.
Open living area:


My office:


Utility room:


Master bedroom:


I was thinking of building shelves almost exactly like that, but opted for wall-to-wall shelving instead. Looks great though.I like simple DIY projects, however I have a lot of improving to do. I love making furniture. I built my desk and some shelves.
I was thinking of building shelves almost exactly like that, but opted for wall-to-wall shelving instead. Looks great though.
Thank you!
Maybe for the better, it is a little expensive.
I really dig that style. What supports the shelves/keeps them level?
Your desk looks just like Altra Furniture's Owen retro coffee table.
I really dig that style. What supports the shelves/keeps them level?
I like simple DIY projects, however I have a lot of improving to do. I love making furniture. I built my desk and some shelves.
Big post incoming:
Suggestions for covering up tiny dry wall holes (less than an inch in diameter)?


Pulling three new circuits through the attic sucked BTW.

Why did it suck? Tight working conditions? Too hot?
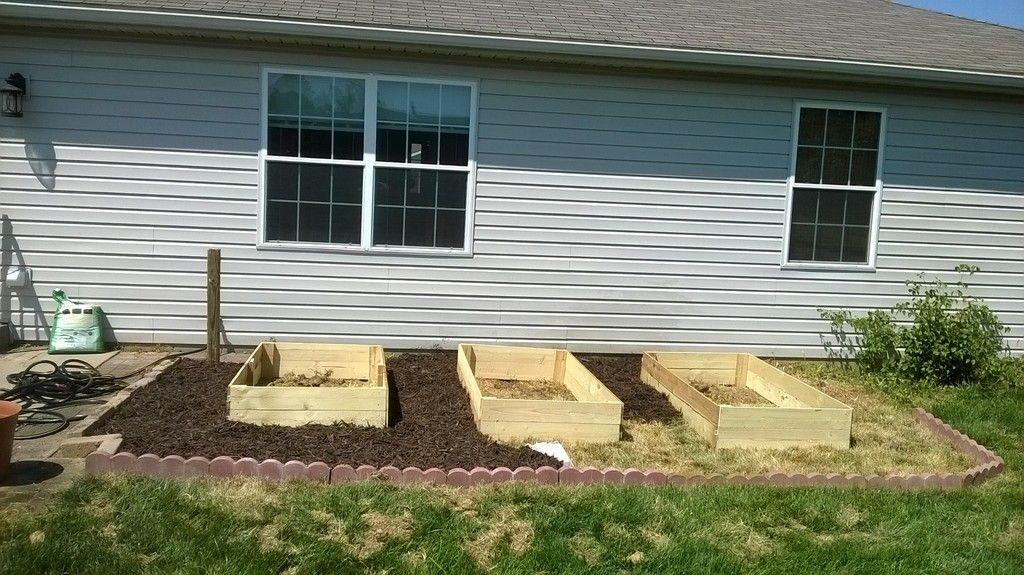
I completed a 16'x12' shed last year. Here's a pic:
Built it using a set of plans from Better Barns website I modified the plans to remove a side door that would have been between the two windows. I also made it a foot taller. Spent about $5K in materials (cedar siding & azek trim accounted for about 1/2 the cost).
My current project is to remodel the basement. Currently in the demolition phase.
Built it using a set of plans from Better Barns website I modified the plans to remove a side door that would have been between the two windows.

Here's a picture of the shed that was on the original plans before I modified it:
I didn't care for the T-111 siding look. I also didn't need the extra door.
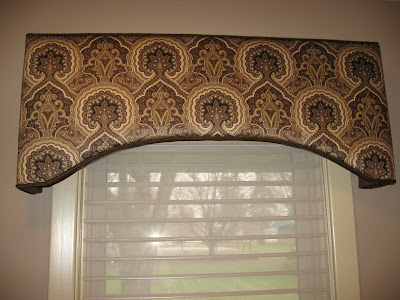
Has anyone done window treatments? I have an interest in making some cornice boards such as this one:
I looked into have some made and it was around $1000 for a single picture window. The woodworking part will be easy. It's the fabric stuff that I'm unsure of.
I like simple DIY projects, however I have a lot of improving to do. I love making furniture. I built my desk and some shelves.
Why did it suck? Tight working conditions? Too hot?
Has anyone done window treatments? I have an interest in making some cornice boards such as this one:
I looked into have some made and it was around $1000 for a single picture window. The woodworking part will be easy. It's the fabric stuff that I'm unsure of.
EDIT:
We finished grouting and sealing the grout this weekend on that guest bath remodel. I still have to paint the walls and add the plumbing but it's close to done now ...
Looks amazing. I love the clean look.
EDIT:
We finished grouting and sealing the grout this weekend on that guest bath remodel. I still have to paint the walls and add the plumbing but it's close to done now ...
EDIT:
We finished grouting and sealing the grout this weekend on that guest bath remodel. I still have to paint the walls and add the plumbing but it's close to done now ...
Looks awesome - I'm beginning to plan out our bathroom remodel. Because plumbing is a pain to get to behind the walls, will most likely go the claw foot tub route with exposed pluming through the floor...have a basement that the plumbing runs through so makes repairs a cinch...and no wall to demolish and get into.
Did you use cement board or kerdi-board or anything like that for the walls aside from your bathtub area? Or just plain drywall for most of the bathroom? A little worried about moisture in the bathroom...
How hard is it to re-tile a bathroom? I'd like to do at least one bathroom this year and I'm thinking about doing it myself. And are tiles super expensive? What are the required tools?
Does anyone have a good tiling guide they can link to?
How much am I really saving doing it myself?
Sorry for all the questions!!
I noticed it looks like you have pex coming out for your tub faucet? Please tell me you aren't using sharkbite fittings?
That's blue masking tape covering the shower valve. Below it is an 1/2"x8" copper stub. There is not pex or sharkbite in that wall. I can solder my own joints. Though I'm not opposed to sharkbite fittings when they make sense. I never use pex pipe though. All copper.
Holy cow, $1,000 for something like that? I feel like that's a business worth getting into!
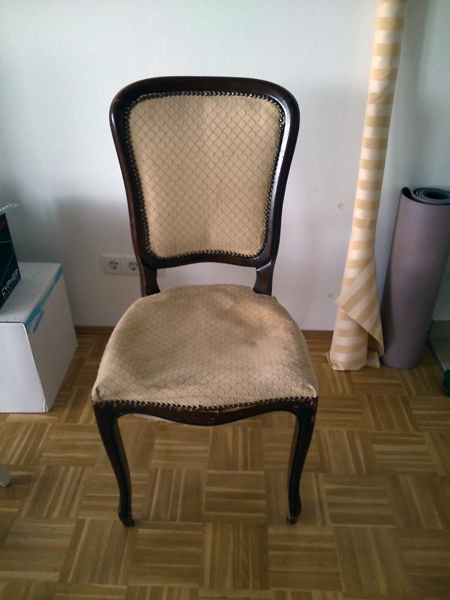
I've never really seen those kinds of things before, but it looks like you'd make the base out of wood (particle board would probably work just fine), and then use the kind of upholster you'd use on a chair. Like someone else in this thread pointed out, it's the tightening of the fabric (preventing ridges/bubbles) that is the hard part and requires many hands to get right. Do you have a fabric/hobby store in your area? We have a ton around here, and I've seen that kind of thing run fairly cheap. I'd say you could do one of those for less than $100. Maybe even less than $50.
I could be way off base, though - anyone else have experience with it?
Online sources like Youtube are great for showing you how to jack up and shim individual posts or around the foundation, but I have yet to find any sources that show you how to properly level a whole house, one post at a time. Issues like identifying the high or low areas, measuring whether a room is level, how much a floor can change before you start cracking walls and breaking windows. We're especially worried as we have lathe and plaster through most of the house, which is more brittle than sheetrock. I picture really breaking up some of the walls if I move the floor enough to properly level them.
We had a structural engineer evaluate the foundation shortly before gathering estimates for having some contractors do the work, and he found it to be very sound, just in need of leveling. Naturally the contractors wanted to sell us a new beam system as well, which came in at over $30k. When I asked for an estimate excluding the new beam system, they never responded.
Given that cost though, I'm doing it solo. But if anyone has any experience or ideas of what to do, I'd love to hear them. The structural engineer suggested making a level map of the house using a water level, which I have not yet investigated.
 It sucks, plaster provides more insulation and soundproofing than drywall (since it's pretty much cement) but cracks really easily...
Oh man, you have balls...I won't touch any foundation related issues...
Contractor leveled our home (plaster and lathe walls) and basically ended up with about $10k in wall damage
Cool thread. I was briefly toying with the idea of making a small wooden stand for my Amiibos... I'm only a little bit embarrassed to say that.
I have zero experience with woodworking of any kind, would a three tiered wooden stand with shallow holes drilled for each Amiibo figurine be too complicated to be my starter project. I have access to most woodworking tools, but I'd need to learn how to use them.
You can drill holes that large by hand, but it requires the item being drilled to be clamped down tight so it doesn't shift during the operation of the drill. A drill press is still a good idea if you are drilling something that needs to be perfectly straight, such as if it's receiving a dowel or leg. A hole saw would work too, but it's a rougher cut and is also pretty expensive.I wanted to go back to this, because I've done a bit more research. I showed this to a friend of mine, and he wanted me to build him one, yet I've run into a little snag.
The guide tells you to just "use a 2" drill bit," but what he doesn't say is what kind of bit, because those are kind of rare. A normal Spade bit, which is what I showed originally, only goes up to 1 1/2", so those are out of the question. You'd be best off using a Forstner bit, and it definitely needs to be done on a drill press and not a standard hand drill. Drilling a hole that wide requires a lot of power.
I felt that was important to share, since it was an oversight on my part in the beginning. Those bits can range anywhere from $15 - $60, depending on what kind of material or what brand you go with. Most shops don't keep them around.
I wanted to go back to this, because I've done a bit more research. I showed this to a friend of mine, and he wanted me to build him one, yet I've run into a little snag.
The guide tells you to just "use a 2" drill bit," but what he doesn't say is what kind of bit, because those are kind of rare. A normal Spade bit, which is what I showed originally, only goes up to 1 1/2", so those are out of the question. You'd be best off using a Forstner bit, and it definitely needs to be done on a drill press and not a standard hand drill. Drilling a hole that wide requires a lot of power.
I felt that was important to share, since it was an oversight on my part in the beginning. Those bits can range anywhere from $15 - $60, depending on what kind of material or what brand you go with. Most shops don't keep them around.
You can drill holes that large by hand, but it requires the item being drilled to be clamped down tight so it doesn't shift during the operation of the drill. A drill press is still a good idea if you are drilling something that needs to be perfectly straight, such as if it's receiving a dowel or leg. A hole saw would work too, but it's a rougher cut and is also pretty expensive.
You can get plunge bits with a 3/4" shank and 2" dia.Dimensions are another sticky point, my pie in the sky plans called for a 6" tall stand, only to find that you can't really buy a piece of wood that big. Lowered it to 5.25 so that a 6x6 would be big enough, but most of the ones I can find are dark and pressure treated for outdoor projects like decks, that seems like overkill for this, any recommendations on where to get the wood I need? Should I plan on buying smaller and doing a lot of gluing? I have a Home Depot and an Ace Hardware in the area, nothing else.
Found the same info after digging a bit, thanks. Now I'm trying to decide if I should buy a 2" Forstner or plan on cutting the boards in half, sawing a 2" hole with a hole saw, then gluing them back together... keeps getting more complicated and I haven't even started yet
Dimensions are another sticky point, my pie in the sky plans called for a 6" tall stand, only to find that you can't really buy a piece of wood that big. Lowered it to 5.25 so that a 6x6 would be big enough, but most of the ones I can find are dark and pressure treated for outdoor projects like decks, that seems like overkill for this, any recommendations on where to get the wood I need? Should I plan on buying smaller and doing a lot of gluing? I have a Home Depot and an Ace Hardware in the area, nothing else.
I wouldn't recommend cutting them in half just for a cut like that and then gluing them back together - you're better off breaking down and getting a Forstner bit.
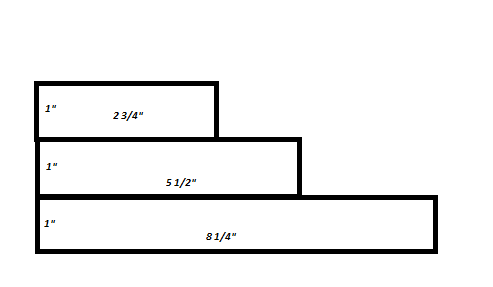
For the second part, I recommend doing what I did. I got a 1" x 10" x 72" oak board, cut it into 14" sections, and laid them out one on top of the other. Then measure out how wide you want each tier to be, and just cut them that way. Like in my original picture:
Those boards aren't very expensive and can be found easily at Menards, Lowes, or Home Depot. The way the guy in the guide did it uses really odd dimensions of lumber. It makes it a lot more complicated.
Cool cool, looks good, makes a lot of sense. My only tiny issue with that is I'd like the levels to be a little larger, maybe 1.5 to 2 inches tall, just so the figures aren't hiding behind each other, you know? I'll check at Home Depot for a 2x10x72 or something comparable.
I'd love to see yours when it's done.
Thanks again!
Edit : Home Depot has Douglas Fir boards that are 2 by 10 by 12 feet, and the actual size of a 2 by 10 is more like 1.5" by 9.5", right? that's perfect for me, even if 12 feet is a little ridiculous, it's only 12 bucks, so sounds like that's what I'll go with.
Awesome. What I'm doing to alleviate the problem with them being on top of each other is I'm staggering them. The bottom tier will have 5 spots, the middle with have 4 spots in between the other tiers, the top will have 5. That way they'll all be visible. Idk how many total Amiibos there are, but my buddy doesn't plan on getting nearly that many.
Project is on hold, though, until I can get a 2" Forstner bit! I'm asking all of my friends and family if they have one, because I really don't want to shell out $15 for a bit I'll only use once.
You have several options for the floor, but make sure that whatever you do, you get a good, sealed vapor barrier down on the concrete before you put anything else down. Moisture coming up from it is a huge red flag that there is not a vapor barrier under it, and you have moisture coming up through it from the ground. Anything you put down will trap that moisture and create rot, or at least cause the bond with the ground to fail unless it's properly sealed.Anyone have experience finishing basements? I'd like to turn mine into a livable space, even if it is not completely finished. I've painted the ceiling rafters white and put drylok over most of the walls. Floor is a disaster, covered in paint and glue. There is a nice finished bathroom from one of the previous owners. Lots of condensation under anything left on the ground. Wanted to stain but the concrete appears to be sealed.
I'd prefer to leave the floors and walls as concrete. Looking for ideas on how to best make the floor attractive and functional. Original plan was to use the basement as my primary media space, but I don't think that's going to pan out... Too much moisture, too much risk. Still would like to utilize it as best I can.
Thought about putting in a raised subfloor but I don't think that'll work for two big reasons
1.) I plan to use the basement as a home gym, and the ceiling is not high enough to allow me to do so if the floor is raised
2.) cost
Didn't put anything in before painting the drylok, but didn't notice moisture collecting through the walls. Floor is frustrating. If I spill water on it, the water beads. Nothing goes through. But if I leave something on the floor, like foil, condensation will build underneath it. And there are puddles where it appears moisture is wicking up through hairline cracks. Not much, but enough to worry.You have several options for the floor, but make sure that whatever you do, you get a good, sealed vapor barrier down on the concrete before you put anything else down. Moisture coming up from it is a huge red flag that there is not a vapor barrier under it, and you have moisture coming up through it from the ground. Anything you put down will trap that moisture and create rot, or at least cause the bond with the ground to fail unless it's properly sealed.
I would start your research with how to properly seal a concrete basement floor. There may be some options there such as using some kind of material that coats the concrete, creating a base coat for a finish to be applied.
Personally, I'd also worry about whether the walls have a proper barrier as well.
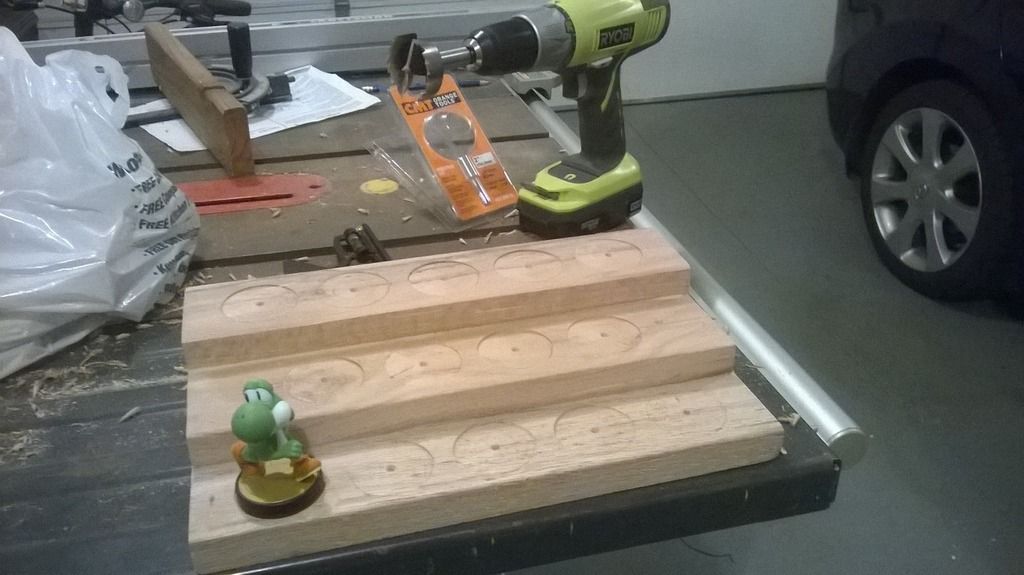
Menards has their 11% off sale right now, so I went ahead and got my 2" Forstner bit (along with lots of gardening stuff which I will post later once it's done).
Unfortunately, my poor cordless drill just doesn't have the power to drill very far. I went ahead and carved out where everything is going.
Will need to use a drill press to finish it up.
Nice! How're you planning on finishing it?
I've been wanting to replace the ceiling and floor molding in my condo because the previous owner did a pretty crappy job. However, the ceiling is kind of bowed. How would you do molding on a ceiling like that?
I don't have a decent picture but under these boards is a mess of goopy melted rubber that needed to be cleaned and the belts replaced to get the tape deck working properly.

It wasn't an easy task but replacing those belts to the specification in the manual made this 34 year old boombox work great.

This is what text looked like:

This is what the test-screen was showing me:

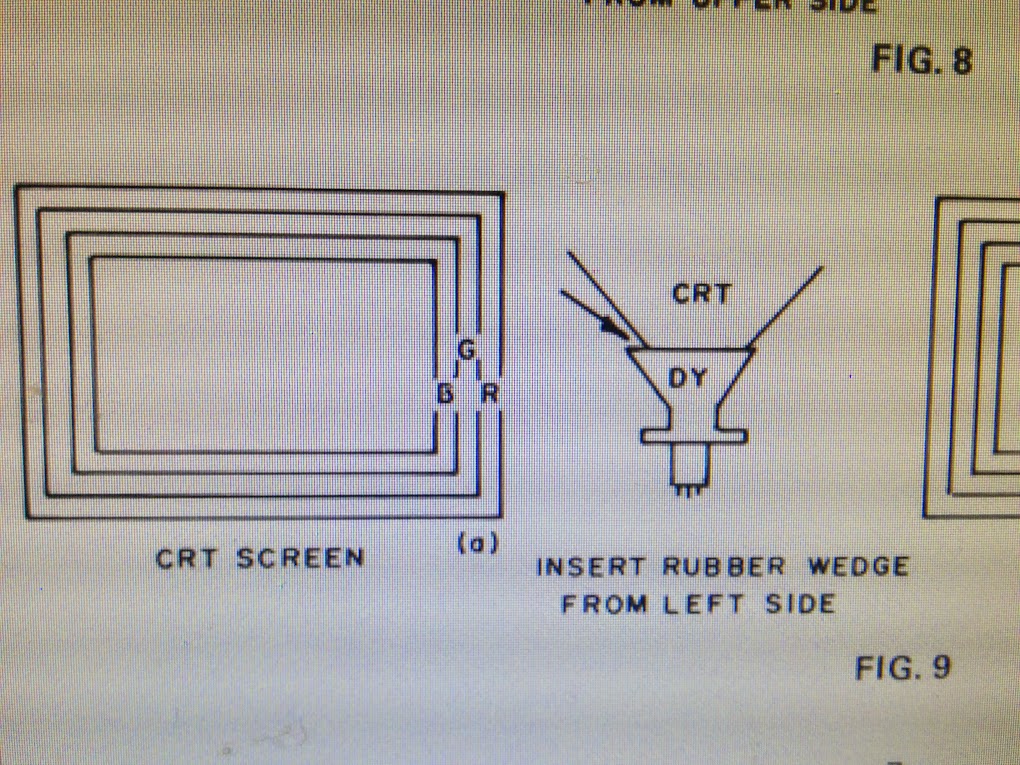
The service manual showed me how to adjust the yoke on the back of the CRT to get better convergence. I didn't even know what a yoke was before
Now the text is much cleaner and easier to read at the edges and the overall picture quality is much improved: