• Hey, guest user. Hope you're enjoying NeoGAF! Have you considered registering for an account? Come join us and add your take to the daily discourse.

DIY |OT| "Can We Fix It?"

I don't have much advice for home repair but I'm into repairing old ghetto blaster boomboxes and other electronics.


I work in IT but I always feel much more accomplished getting old stuff like this working. I think troubleshooting the issue accurately is one of the most important parts. Being aware of what goes wrong with older stuff. If you're repairing old electronics the things to look for are universal:

-Rubber components withered away into goop
-Broken brittle plastic
-Failing capacitors
-Broken solder joints
-Corrosion
-Power supply issues (Also, fuses. You never know what a prior owner plugged into something so it's always good to check for a blown fuse)

Being able to track down and fix these things is doable for any laymen and you really don't need to know any advanced theory or anything to get a job done.

That said, if you truly want to fix old electronics and bring them into perfect working order you have to track down the service manual from the manufacturer. Sometimes you might even have to break down and buy a printout of a PDF on ebay or something because they can be incredibly difficult to track down and people use that opportunity to make money. Just recently I fixed some convergence issues on a K7000 arcade monitor even though I have no experience doing such a thing. I was able to read how they did it in the service manual and that was enough. It's not perfect yet but good for a first try.


Track down those service manuals!

This is awesome. I have an uncle that does the same kind of repairs that you do, and he gets more and more business as time goes on.
I admire people that can repair electronics. I mean, I can fix software in a computer, but I can't fix the computer itself. I have no freakin clue where to start.

Kudos to you, man! That's a sweet niche to have.
 

n64coder

Member
I don't have much advice for home repair but I'm into repairing old ghetto blaster boomboxes and other electronics.

A common issue with old CD players is that they fail to open/close. I'm assuming that it's a belt issue. Any thoughts on that? Where would you get a replacement belt?
 
A common issue with old CD players is that they fail to open/close. I'm assuming that it's a belt issue. Any thoughts on that? Where would you get a replacement belt?

Yeah, that's definitely a belt issue if we're talking CD trays. The good thing about a CD tray is that you really only need a belt that's a similar size and it doesn't have to be exact. As long as it grips and isn't too small it'll usually work. If it's too small it might work still but would cause additional wear.

You can try to find a small rubber band, an O ring, rubber belts for a sewing machine, or look on eBay for an assorted pack like this:

http://www.ebay.com/itm/10-Assorted...888?pt=LH_DefaultDomain_0&hash=item35e8555800

I usually try to find an assorted pack because belts are always useful to have around.
 

Linkhero1

Member
I guess this is probably the most appropriate place to ask. What are some good solutions to hiding tv/console/computer cables? They're all over the place and constantly tangle up. I don't want to drill holes in the wall or anything, but something simple would be great.
 

dubc35

Member
I guess this is probably the most appropriate place to ask. What are some good solutions to hiding tv/console/computer cables? They're all over the place and constantly tangle up. I don't want to drill holes in the wall or anything, but something simple would be great.

Zip ties will clean up the "tangle" issue but won't hide them. You could go more permanent into a conduit as well.

For the TV cables you could use a raceway like the pic below. You can paint them to match the wall. They probably need to be screwed to the wall though (ie holes). i have never installed one so maybe someone else can chime in.

fsNTV3H.jpg
 

Linkhero1

Member
Zip ties will clean up the "tangle" issue but won't hide them. You could go more permanent into a conduit as well.

For the TV cables you could use a raceway like the pic below. You can paint them to match the wall. They probably need to be screwed to the wall though (ie holes). i have never installed one so maybe someone else can chime in.

I was thinking of going with zip ties, but wanted to see if there are any alternatives. I don't want to necessarily hide them, but clean them up. Drilling holes is the last thing I want to do since I'm only renting and will probably be out within the next year.

Edit: I was also thinking of using velcro as well.
 

dubc35

Member
Velcro or double sided tape could work. My main concern would be tearing off the paint when I removed it; you want it to adhere but not adhere too well.

edit, wiremold seems to make various "kits' for concealing wires. Some decent options, or ideas to spur more options in the comments here.
 
Velcro ties are the bomb, since they're reusable and really cheap. I like them better than zip-ties since they're easier to remove and a little wider. They're best used for cord wrangling.

Like others have mentioned, there are things that run down your wall that you can use.

For wall-mounting a TV/Monitor, if you're interested in it, there is a really good but invasive option. You could drill a 1-1/4" hole right behind the TV/Monitor and feed it through to where it needs to be plugged in (where you would drill another hole). Like I said though, this is invasive, and you need a stud finder to make sure there isn't anything in the way of it. Not many people are very comfortable with this.
 

Red

Member
Drilling holes to hide wires is not very difficult, and the holes are easy to patch if you must cover them back up when you move out of your rental. But like others have said, it's easiest to simply tie them and get them out of the way.

I am actually considering a similar problem, but I'm working against concrete.
 

Linkhero1

Member
Velcro ties are the bomb, since they're reusable and really cheap. I like them better than zip-ties since they're easier to remove and a little wider. They're best used for cord wrangling.

Like others have mentioned, there are things that run down your wall that you can use.

For wall-mounting a TV/Monitor, if you're interested in it, there is a really good but invasive option. You could drill a 1-1/4" hole right behind the TV/Monitor and feed it through to where it needs to be plugged in (where you would drill another hole). Like I said though, this is invasive, and you need a stud finder to make sure there isn't anything in the way of it. Not many people are very comfortable with this.

I'll look into the velcro ties. They might be just what I'm looking for. If the house were mine I wouldn't mind drilling holes, but since it's not I try to avoid that.
 

Red

Member
Velcro or double sided tape could work. My main concern would be tearing off the paint when I removed it; you want it to adhere but not adhere too well.

edit, wiremold seems to make various "kits' for concealing wires. Some decent options, or ideas to spur more options in the comments here.

I agree with this comment under that link:
The simple drywall repair job required to cover a small hole punch for a few cords at the rear mount down at the floor would be no more time consuming than the numerous small holes you'd need to spackle for most (ugly) wire tracks.
 
I agree with this comment under that link:

If someone has smooth drywall this is probably the case. IF someone has textured drywall .... not so cut and dry. Patching drywall with texture can be a bitch trying to match the current texture on the wall. If someone has a rough knock down, for example, they can't just cut out a square and put one back and expect it to look the exact same as the wall.

At least not without some level of skill.
 

Red

Member
If someone has smooth drywall this is probably the case. IF someone has textured drywall .... not so cut and dry. Patching drywall with texture can be a bitch trying to match the current texture on the wall. If someone has a rough knock down, for example, they can't just cut out a square and put one back and expect it to look the exact same as the wall.

At least not without some level of skill.
I've never had to patch textured drywall, so will take your word on it.

Any suggestions on how to create a transition from concrete to wood rafters in an unfinished basement?
 

Hilti92

Member
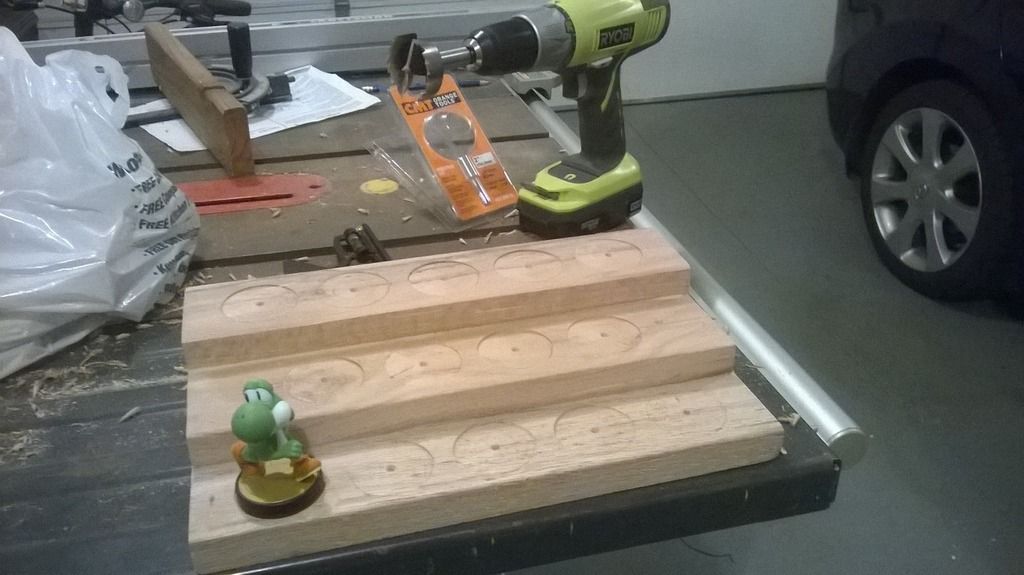
Menards has their 11% off sale right now, so I went ahead and got my 2" Forstner bit (along with lots of gardening stuff which I will post later once it's done).

Unfortunately, my poor cordless drill just doesn't have the power to drill very far. I went ahead and carved out where everything is going.

11266109_10100960180552743_1780553405_o_zpsx6wsfeu1.jpg


Will need to use a drill press to finish it up.
You pretty well need a corded drill to make deep holes with a bit that size. My Milwaukee cordless struggles with a bit that big and it's a half decent drill. Just go to a construction site and offer someone $5 to do the rest for you.
 

n64coder

Member
I don't want to drill holes in the wall or anything, but something simple would be great.

Drilling holes is the best option. Do you have the option of making some holes and then using these plates in them so they look nice and could be used by the next tenant? Maybe you can get permission from the landlord to do this?

59531whbig.jpg
 

VanWinkle

Member
This past fall and winter, I did a lot of projects in our crawl space. I plan to finish some of those, and a few more, when the fall rolls around again and our lovely Oregon rain prevents me from doing outdoor projects.

The one I'm most worried about is leveling the floor. The house is on a post and beam system, having been raised onto its current foundation around 50 years ago. The old growth beams are in great shape, but the floor in the house is decidedly wavy, as many posts have settled and been reshimmed many times over. Some rooms drop well over an inch and back up again in places. I plan to do some work leveling the waviest parts of the house, after which I'll put down a proper vapor barrier; the current one is thin, torn and patchy, showing lots of dirt (and thus moisture).

Online sources like Youtube are great for showing you how to jack up and shim individual posts or around the foundation, but I have yet to find any sources that show you how to properly level a whole house, one post at a time. Issues like identifying the high or low areas, measuring whether a room is level, how much a floor can change before you start cracking walls and breaking windows. We're especially worried as we have lathe and plaster through most of the house, which is more brittle than sheetrock. I picture really breaking up some of the walls if I move the floor enough to properly level them.

We had a structural engineer evaluate the foundation shortly before gathering estimates for having some contractors do the work, and he found it to be very sound, just in need of leveling. Naturally the contractors wanted to sell us a new beam system as well, which came in at over $30k. When I asked for an estimate excluding the new beam system, they never responded.

Given that cost though, I'm doing it solo. But if anyone has any experience or ideas of what to do, I'd love to hear them. The structural engineer suggested making a level map of the house using a water level, which I have not yet investigated.

This Youtube video just came up in my subscription box and it reminded me of this post. I don't know if it's of any real use to you, but figured I'd post it just in case.
 
Just go to a construction site and offer someone $5 to do the rest for you.

Everything about this is the exact opposite of this thread's purpose!! Ahh!

Anyways, I finished last night. Some takeaways:

-If you decide on a clear-coat for the finish, use a spray one if you can find it. I had a lot of issues with it pooling up in the holes and having to sponge it out with a towel. I still need to sand some shiny parts down.
-A Drill Press makes the holes insanely easy. The one I used has a nut-locking system where you can tell it which depth to stop drilling, so it'll stop you before you go too far.
-Take a break after drilling about 5 holes - the bit will get really hot and it needs to cool off.

20150520_222119_zpsusuztcng.jpg
 

Red

Member
Anyone put up color changing LED strips? I need about 48 feet of lights, but can only find them in 16.4 ft strips. I want to buy three strips and daisy chain them, but instructions say amplifiers are needed for any more than two strips (and to not chain them). Despite this, I've seen set ups that appear to daisy chain strips and was hoping I could do the same, maybe with a more powerful AC unit.
 

n64coder

Member
Anyone put up color changing LED strips? I need about 48 feet of lights, but can only find them in 16.4 ft strips. I want to buy three strips and daisy chain them, but instructions say amplifiers are needed for any more than two strips (and to not chain them). Despite this, I've seen set ups that appear to daisy chain strips and was hoping I could do the same, maybe with a more powerful AC unit.

Can you post a link to the LED strips that you're looking at?
 

Embearded

Member
Everything about this is the exact opposite of this thread's purpose!! Ahh!

Anyways, I finished last night. Some takeaways:

-If you decide on a clear-coat for the finish, use a spray one if you can find it. I had a lot of issues with it pooling up in the holes and having to sponge it out with a towel. I still need to sand some shiny parts down.
-A Drill Press makes the holes insanely easy. The one I used has a nut-locking system where you can tell it which depth to stop drilling, so it'll stop you before you go too far.
-Take a break after drilling about 5 holes - the bit will get really hot and it needs to cool off.

20150520_222119_zpsusuztcng.jpg

Looks wonderful mate, nice job!
Post a picture when you install it on the wall and put the amiibos on it.
 
A week or so ago I had a 3DS XL and a bottle of coke/lemonade in my bag and it leaked (shitty asda bottle quality) drowning my 3DS (had to happen literally the one time I take my 3DS anywhere).

I discovered this on the escalator and in a rush to rescue said 3DS I dropped pretty hard onto said escalator.

Totally ruined the R button, but yesterday I was like fuck it and opened the console up and messed around with the button, spring, plug thingy, and hinge and stuff. Literally no idea what I was doing, but managed to fix it.

Really chuffed with myself. Especially considering the last time I opened up something electronic that was broken and was not a PC I broke the screen or something (PSP).
 

n64coder

Member
Anyone put up color changing LED strips? I need about 48 feet of lights, but can only find them in 16.4 ft strips. I want to buy three strips and daisy chain them, but instructions say amplifiers are needed for any more than two strips (and to not chain them). Despite this, I've seen set ups that appear to daisy chain strips and was hoping I could do the same, maybe with a more powerful AC unit.

I think the issue is that if you do more than 2 daisy-chained, the wire in the strip cannot handle the current. According to this comment, it says that you can do more than two by using repeater/amplifier.

Q: I am trying to run a span of 48 total feet how many repeaters will i actually need? One after Every 16 foot run?

A: The power source that came with your LED roll should power up to two LED rolls (16ft each), the repeater will also power up to two (one line coming in and two lines going out (being repeated)). If you need 48ft then you would 3 LED rolls and 1 repeater. 1st LED roll connects to the power source / controller, 2nd roll to the end of the 1st LED and the other end in the repeater IN, third LED roll connects to the repeater OUT.
You would still be able to attached a 4th LED roll to the 2nd repeater Out- if you wanted an additional 16ft (64ft total). Hope this helps... good luck! see less
 
Hey there handy-bros. I'm gonna build myself a nice little desk this weekend, wanted to get some input and make sure I'm not missing anything obvious.

My last roommate just moved out of my house, and I'm turning his old room into my office. I was to build a sort of floating desk, with no real legs. Planning on picking up a slab of countertop from the Ikea 2 miles away. I'm going to mount this right onto the wall using 4 of these.

More than anything I'm just concerned about the stability of the desk, is this enough to hold it up reliably? I'll be mounting the brackets into studs in the drywall, but is a 16" bracket long enough to support the table or should I get the 20" brackets? "Desk will be 26" deep.

Let me know what you think. All suggestions are welcome.
 

Red

Member
Looks like your counter weighs 87 lbs. and the brackets are rated for a half ton load. They extend over 50% the depth of the desk and with four of them, the weight will be well distributed. I guess you'd be fine.
 

GhaleonEB

Member
My only suggestion is to make sure the screws that secure it good quality and to over 1/2 of the way into the counter top. A 10" overhang is doable, but since it's a heavy table top and will have added weight on the overhang (resting arms, etc.) you want the back portion of the table secured well. Each bracket has three screws for securing the counter top to it, with two of them in the half near the wall. So that means 8 screws will be what keeps the desk from detaching and pivoting over the bracket.

I typed that up and then went to see how thick the desk top was at your link. It's veneer over particleboard, which does not take a screw very well. (I was going to suggest cabinet screws to secure it if it was solid wood). Given this I would go with the 20" version of the bracket. Particleboard needs support from underneath or it can sag, and the shorter cantilever will mean there is less pull on the screws in the back and so less risk of them stripping out the particleboard.

Alternately (and perhaps more wisely), do a through bolt on the back row of bracket holes and cover or dress up the screw heads that show on the top of the desk. That would eliminate the risk that it would ever pull out under normal loads.

Yeah, nail on the head for what I was concerned about with the 16" brackets and the particleboard core. Thanks for the suggestions.
 

Vyer

Member
I want to like DIY, but man if I don't find that it pisses me off more than anything.

I have learned over the years though how absolutely vital it is to have 'the right tool for the job'. Saves so much frustration.
 
I want to like DIY, but man if I don't find that it pisses me off more than anything.

I have learned over the years though how absolutely vital it is to have 'the right tool for the job'. Saves so much frustration.

Yes and no. Part of DIY is making use of your situation with the tools you have. Not everyone has a full shop to do everything. Sometimes, yeah, you need a tool. Sometimes you can rig up something to make due with what you have. Part of the DIY attitude is patience and problem solving. You need a little bit of both.

Looks wonderful mate, nice job!
Post a picture when you install it on the wall and put the amiibos on it.

It was a gift for a good friend of mine. Here's what it looks like on his dresser.

20150528_184534_zpsnlepyxgl.jpg
 
So I did the finsihed plumbing and set the appliances this last weekend. Weekend before was floors and molding.

Almost done ...
 

Red

Member
So I did the finsihed plumbing and set the appliances this last weekend. Weekend before was floors and molding.

Almost done ...
Can you post some before and after pictures?

One more toilet to replace in my new house. Molding is 95% done. I've been using painter's caulk to cover nail holes and seal gaps between trim and wall. Is there a better way? The painter caulk leaves a sheen over where paint meets the trim, and I almost prefer the gap. Going to have to go around the house and hit caulked-over nail spots with white paint, especially on door frames.

Decided on luxury vinyl planks for the basement. Not started yet. Had to replace the sump pump two nights ago due to a flood. Dumped a 12-gallon wet vac a good 10 times and let the new sump take care of the rest. Previous sump pump was plastic and had corroded away, the bolts were so rusted they practically crumbled. Previous owners said it was only 4 years old, but I'm not sure I buy that... Either way, homeowner's insurance covered the new cast iron model we installed.

I'm installing a 60" Sharp Aquos onto a fully articulating wall mount on the concrete. The mount supports up to 165lbs. The TV is 85lbs. I haven't bolted anything to concrete before, but I think my father-in-law has. He will probably advise. I plan to turn the basement into a game room, using an old workstation PC to power things. Everything will be elevated and moved away from the walls. Hope that is enough precaution. I might get a humidity monitor for down there to keep an eye on things.

Our renovation budget was $7,000, but we've nearly doubled that. Should still be okay but I hope we don't run into anymore snags. It's like we find something that requires an immediate fix every day we try to start a new project. It's frankly shocking the previous owners didn't manage to kill themselves or burn the place down considering some of the ass-backwards "improvements" they made.
 

n64coder

Member
I've been using painter's caulk to cover nail holes and seal gaps between trim and wall. Is there a better way? The painter caulk leaves a sheen over where paint meets the trim, and I almost prefer the gap. Going to have to go around the house and hit caulked-over nail spots with white paint, especially on door frames.

Are you trying to avoid painting after filling nail holes and gaps? Personally, I use MH Ready Patch to fill nail holes and sand it flush after it's dried. I use high quality caulk for the gaps. I always coat with primer and then two coats of paint.

Decided on luxury vinyl planks for the basement. Not started yet. Had to replace the sump pump two nights ago due to a flood. Dumped a 12-gallon wet vac a good 10 times and let the new sump take care of the rest. Previous sump pump was plastic and had corroded away, the bolts were so rusted they practically crumbled. Previous owners said it was only 4 years old, but I'm not sure I buy that...

Sump pumps can last 1 year or it might last 5-10 years. It depends on what minerals are in the water and how frequently it pumps. Do you have a single pump or dual pumps with battery backup? I recommend spending $1000-$1500 for a dual system with battery backup. I recommend Nexpump dual system. I think we spent around $1000 for the system. Bought the batteries and battery covers from Walmart. I also recommend getting a spare pump to keep on the shelf for when one of the pumps eventually fail.
All of the pumps I've seen will get rusted so I think that's normal.
 

Red

Member
Are you trying to avoid painting after filling nail holes and gaps? Personally, I use MH Ready Patch to fill nail holes and sand it flush after it's dried. I use high quality caulk for the gaps. I always coat with primer and then two coats of paint.
All our trim is white, but the caulk is a slightly different white, so every patch needs to be repainted. It's not like it's a difficult job. Just getting tired after working on this house for a month. It's disheartening to fix a gap and repaint and see the caulk show through the paint where the trim meets the wall.


Sump pumps can last 1 year or it might last 5-10 years. It depends on what minerals are in the water and how frequently it pumps. Do you have a single pump or dual pumps with battery backup? I recommend spending $1000-$1500 for a dual system with battery backup. I recommend Nexpump dual system. I think we spent around $1000 for the system. Bought the batteries and battery covers from Walmart. I also recommend getting a spare pump to keep on the shelf for when one of the pumps eventually fail.
All of the pumps I've seen will get rusted so I think that's normal.
We have a battery backup and plan on getting a spare pump. I hear there is another type which uses the flow of water to provide a backup pump, which sounds more convenient to me. Haven't looked into it yet. As a first time homeowner, a lot of this is new to me.
 

n64coder

Member
All our trim is white, but the caulk is a slightly different white, so every patch needs to be repainted. It's not like it's a difficult job. Just getting tired after working on this house for a month. It's disheartening to fix a gap and repaint and see the caulk show through the paint where the trim meets the wall.
Are you priming and then doing two coats. If the wall paint is eggshell or less glossy, you can get away with just repainting the patched area without having to do the whole wall again. But otherwise, you should paint the wall or trim up to the next break (e.g, corner).

We have a battery backup and plan on getting a spare pump. I hear there is another type which uses the flow of water to provide a backup pump, which sounds more convenient to me. Haven't looked into it yet. As a first time homeowner, a lot of this is new to me.

Yes, there's such a system. Are you on town water or do you have a well? It's my understanding that the system will use 1 gallon of water to pump out 2-3 gallons of water. To me, it seems kind of wasteful to use water to pump out water. I would stick with a regular backup pump. The nice thing about Nexpump is that it is part of your network so you can get notification if there's a pump failure or battery issue or no power.

At my church, the parsonage has a high water table and we've had 3 sump pump failures between 2007-2010 which caused the basement to get anywhere from 2 to 8 ft of water!! The first time happened before I was the president of the Trustees. The pump lasted 5 or so years and then failed causing the basement to be flooded. The fire department had to be called to get the basement pumped out.

Some church volunteer replaced the pump. Less than a year later, I took over the Trustees and then got a call around 10pm at night from the pastor that the basement had 2 ft of water. It turns out that the pipe connecting to the pump came loose because it was installed incorrectly. I had a plumber replace the pump and redo the connection. A year later, the pump failed and the basement flooded again.

That was unacceptable for the pastor and his family to have the basement get flooded three times! That's when we purchased the Nexpump dual pump system and haven't had an issue since. Yes, we've had two pump failures over 5 years but when it happened, the faulty pump would get replaced with the spare pump. It's worth the peace of mind to not have a flooded basement again.
 

Red

Member
We used satin paint for the walls and semi-gloss on the trim. When I try touching up the gaps after they've been caulked, the new paint has a different sheen from off angles that is more distracting than the gaps were in the first place. I haven't been using primer for the touch-ups. Maybe I should. New paint on the trim is not as noticeable, but the caulked nail spots all require sanding.

Thanks for the info on sump pumps. I'll look into the system you suggested. At $1,000 the cost is high for us right now. We've already overspent. But getting a reliable pump system remains a priority.
 
Speaking of Sump Pumps, my crawl space is rather... difficult to get into. So, checking the sump pump is a pretty big task. Is there a pump or a system out there that'll alert you when your sump pump isn't working right? It seems like a good feature to have on one.
 

Red

Member
Water leak alarms are as cheap as $10.

If you mean an alert before a leak occurs, that sounds like what n64coder suggested.
 

n64coder

Member
Speaking of Sump Pumps, my crawl space is rather... difficult to get into. So, checking the sump pump is a pretty big task. Is there a pump or a system out there that'll alert you when your sump pump isn't working right? It seems like a good feature to have on one.

The Nexpump system has intelligent controls. It has audible alerts and will also use the phone to contact you (our system is older, newer ones do direct email/texts/calls) to let you know that a problem exists. Some of the problem alerts are: bad pump, battery needs replacement, loss of power, high water sensor on. It also keeps track of how long the pump has run and it will exercise the pump periodically.

One other interesting thing that it does is that it uses one pump as primary and uses the backup sparingly rather than use them equally. The idea is that if a pump fails, it wants the backup pump to have as much life left before it fails.

There are probably other sump pump systems out there that are intelligent but when I did the research 5 years ago, I found this one to be the best option in terms of price and capabilities.

Water leak alarms are as cheap as $10.

Yes, this is a good option.
 

DarthWoo

I'm glad Grandpa porked a Chinese Muslim
Not sure if anyone will see this before the morning, but I've got a bit of a plumbing issue, and I was hoping maybe someone would have a suggestion before I spend hundreds of dollars on a plumber.

The kitchen sink is severely clogged. It is a single basin sink with a garbage disposal. I've already tried removing the U shaped pipe underneath and clearing that out, and pushed a drain snake at least a few feet into the pipe behind that and came back out with nothing. It will very gradually drain on its own, but at current speeds, it would take about an hour to drain a quarter of the sink. Plunging did nothing. When I turn on the disposal, the water level will briefly lower, but as soon as I turn it off, it backs right back up into the sink. (Some of the water is also disturbingly backing into the bottom of the dishwasher.) From all this I surmise that the clog must be somewhere farther than I managed to get the snake? While I had the U pipe removed, I turned on the sink briefly, and it seemed to be flowing through the disposal and into the bucket I had underneath just fine. It's getting way too late here and I can't just stay up trying futilely to fix it.
 

DarthWoo

I'm glad Grandpa porked a Chinese Muslim
Sorry to bump, just wanted to give this one more shot before calling the plumber in an hour.
 

DarthWoo

I'm glad Grandpa porked a Chinese Muslim
Have you tried using Drano? Worked for my tub before.

Had thought about it, but was hesitant due to the water backing up into the dishwasher. That and it seems like a pretty bad clog, with our pipes being of the plastic sort. I've heard that if it doesn't break up the clog, it can just sort of sit there and eat a hole in your pipes.
 
I had a similar issue before. What I did was pour Dawn into the sink (liberally), let it sit for about 10 minutes, then fill a large bowl with very very hot water. Dump it in there, plunge, repeat. After about 3 or 4 times, it was cleared.
 

DarthWoo

I'm glad Grandpa porked a Chinese Muslim
Well, I did end up calling the plumber (one my family knows and has used in the past, but who runs a pretty small operation) and he took a look and said I'll have to call Roto-Rooter or someone with a longer snake. Disconnected and plugged the dishwasher and tried plunging too. Seems the clog is likely somewhere in 35' of piping in the basement. On the plus side, he didn't charge anything since he couldn't fix it. Having friends over later in the evening, so hopefully RR has prompt service.
 
Top Bottom