-
Hey, guest user. Hope you're enjoying NeoGAF! Have you considered registering for an account? Come join us and add your take to the daily discourse.
You are using an out of date browser. It may not display this or other websites correctly.
You should upgrade or use an alternative browser.
You should upgrade or use an alternative browser.
DIY |OT| "Can We Fix It?"
- Thread starter bennywhatever
- Start date
Well that sucks, according to the Roto-Rooter plumber, a whole section of pipe (from the back of the sink all the way into the basement) will have to be replaced. Took a look in the basement, and I don't know if it was already giving way before, or if all of my and the first plumber's plunging helped, but there's a tiny section of pipe that's starting to give way and is already leaking. It's right at a section that looks like it's got a bigger ring around it, but there is some brown gunk coming out from that joint, and I've had to put a bucket under it for now. I'd have had them work on it today, but I have a party tonight and I can live without a kitchen sink for a couple days, and it's just a hassle for the moment. They estimate it will be anywhere between $600-700. :/
The side of my new house is slanted, and water ends up against my house. It was a mud pit when all the snow melted. This summer I want to make a french drain to get the water out of there. Or a faux drain with just stones. Does anyone have any tips or guides they would suggest?
The problem is that all of the guides I read say that the french drain should be 4-6 feet from the foundation, but due to the way the fence is positioned, it'd have to be ~2 feet away. I don't know what I'm risking if I were to do it so close.
The problem is that all of the guides I read say that the french drain should be 4-6 feet from the foundation, but due to the way the fence is positioned, it'd have to be ~2 feet away. I don't know what I'm risking if I were to do it so close.
Fenderputty
Banned
Can you post some before and after pictures?
One more toilet to replace in my new house. Molding is 95% done. I've been using painter's caulk to cover nail holes and seal gaps between trim and wall. Is there a better way? The painter caulk leaves a sheen over where paint meets the trim, and I almost prefer the gap. Going to have to go around the house and hit caulked-over nail spots with white paint, especially on door frames.
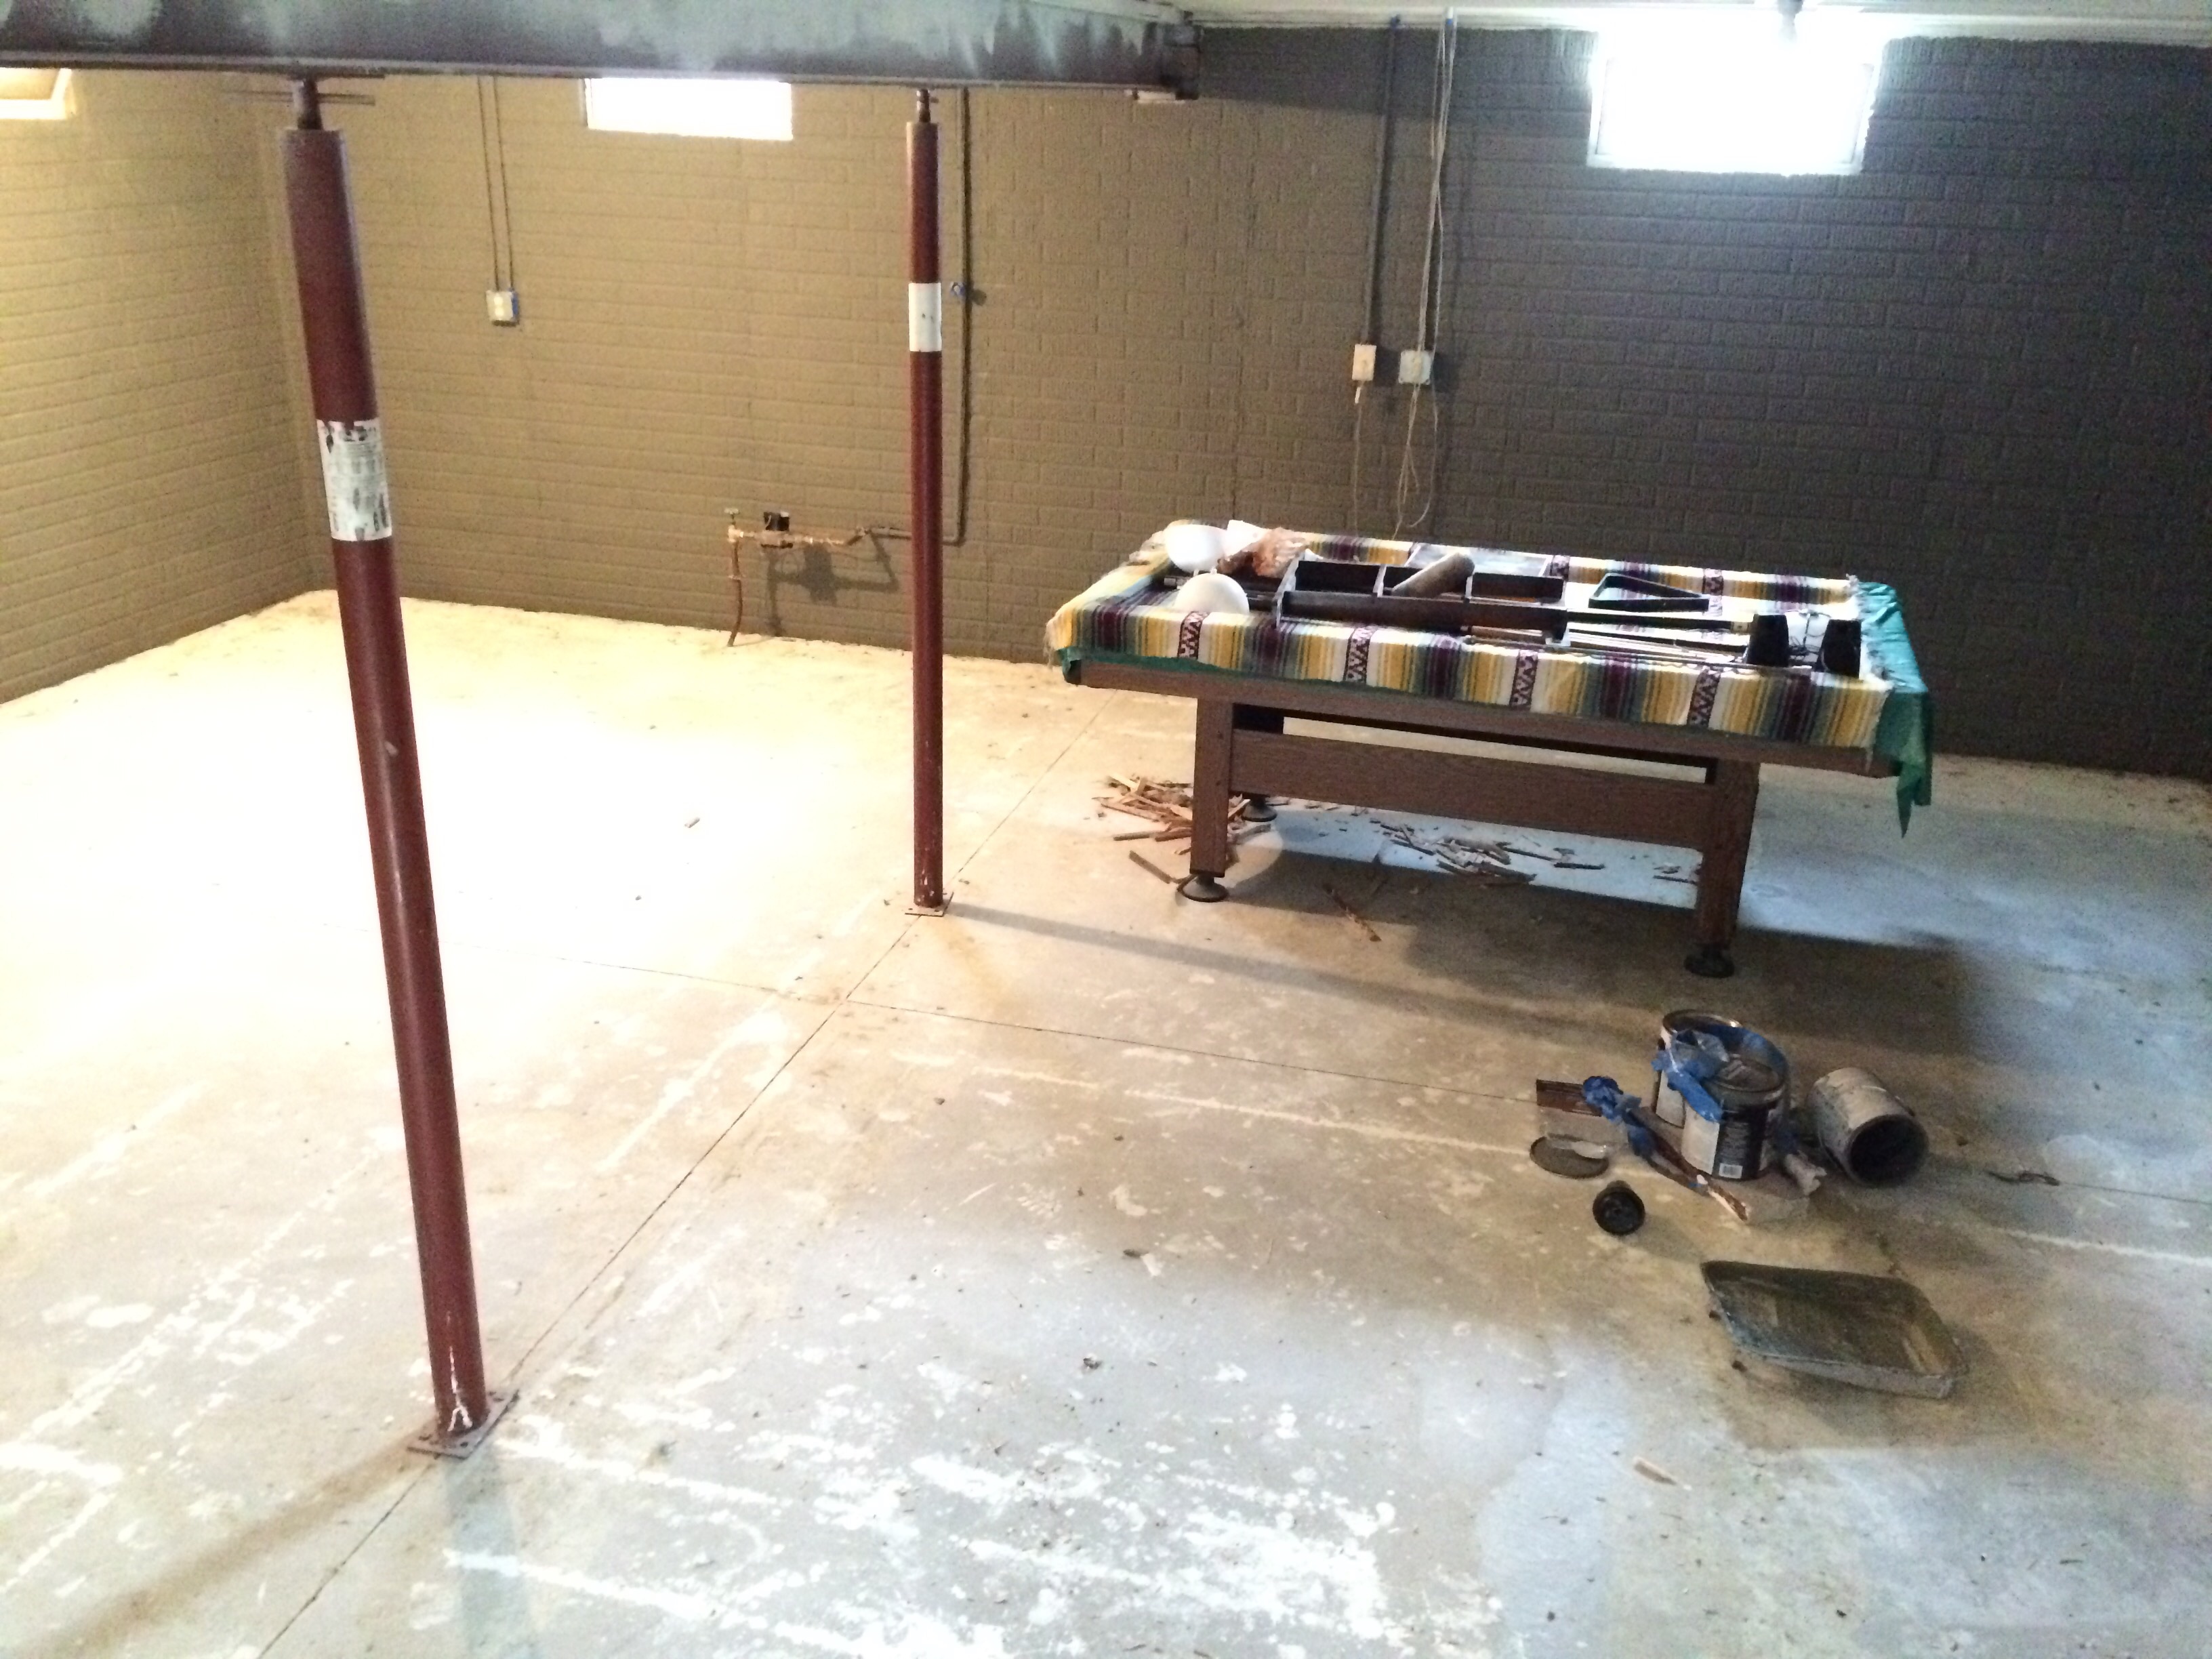
Decided on luxury vinyl planks for the basement. Not started yet. Had to replace the sump pump two nights ago due to a flood. Dumped a 12-gallon wet vac a good 10 times and let the new sump take care of the rest. Previous sump pump was plastic and had corroded away, the bolts were so rusted they practically crumbled. Previous owners said it was only 4 years old, but I'm not sure I buy that... Either way, homeowner's insurance covered the new cast iron model we installed.
I'm installing a 60" Sharp Aquos onto a fully articulating wall mount on the concrete. The mount supports up to 165lbs. The TV is 85lbs. I haven't bolted anything to concrete before, but I think my father-in-law has. He will probably advise. I plan to turn the basement into a game room, using an old workstation PC to power things. Everything will be elevated and moved away from the walls. Hope that is enough precaution. I might get a humidity monitor for down there to keep an eye on things.
Our renovation budget was $7,000, but we've nearly doubled that. Should still be okay but I hope we don't run into anymore snags. It's like we find something that requires an immediate fix every day we try to start a new project. It's frankly shocking the previous owners didn't manage to kill themselves or burn the place down considering some of the ass-backwards "improvements" they made.
I will post for sure. You're doing it correctly. Painters caulk or spakle. Spakle has to be sanded though before touch up paint. Yes it's a pain to touch up paint, but the results are worth it. The gaps look way worse until after a touch up.
Remodels are like onions. You never know how many layers deep it goes. Please post your pics as well. Love to See it!
Well that sucks, according to the Roto-Rooter plumber, a whole section of pipe (from the back of the sink all the way into the basement) will have to be replaced. Took a look in the basement, and I don't know if it was already giving way before, or if all of my and the first plumber's plunging helped, but there's a tiny section of pipe that's starting to give way and is already leaking. It's right at a section that looks like it's got a bigger ring around it, but there is some brown gunk coming out from that joint, and I've had to put a bucket under it for now. I'd have had them work on it today, but I have a party tonight and I can live without a kitchen sink for a couple days, and it's just a hassle for the moment. They estimate it will be anywhere between $600-700. :/
Consider yourself lucky it wasn't a main at your yard costing you multiples of thousands.
n64coder
Member
The side of my new house is slanted, and water ends up against my house. It was a mud pit when all the snow melted. This summer I want to make a french drain to get the water out of there. Or a faux drain with just stones. Does anyone have any tips or guides they would suggest?
The problem is that all of the guides I read say that the french drain should be 4-6 feet from the foundation, but due to the way the fence is positioned, it'd have to be ~2 feet away. I don't know what I'm risking if I were to do it so close.
Is there a way to regrade the landscaping so that water slopes away from the house? That would be the ideal way. Do you have a picture of the area that you can post?
Well that sucks, according to the Roto-Rooter plumber, a whole section of pipe (from the back of the sink all the way into the basement) will have to be replaced. Took a look in the basement, and I don't know if it was already giving way before, or if all of my and the first plumber's plunging helped, but there's a tiny section of pipe that's starting to give way and is already leaking. It's right at a section that looks like it's got a bigger ring around it, but there is some brown gunk coming out from that joint, and I've had to put a bucket under it for now. I'd have had them work on it today, but I have a party tonight and I can live without a kitchen sink for a couple days, and it's just a hassle for the moment. They estimate it will be anywhere between $600-700. :/
Yeah snaking a drain is great way to find weak spots in your old pipes, "great the pipe is draining! Oh it's draining onto the floor". I've given up on amatuer plumbing, it always turns into a bigger job/problem.
The estimate seems a little bit high, but that's what you get with Roto-Rooter.
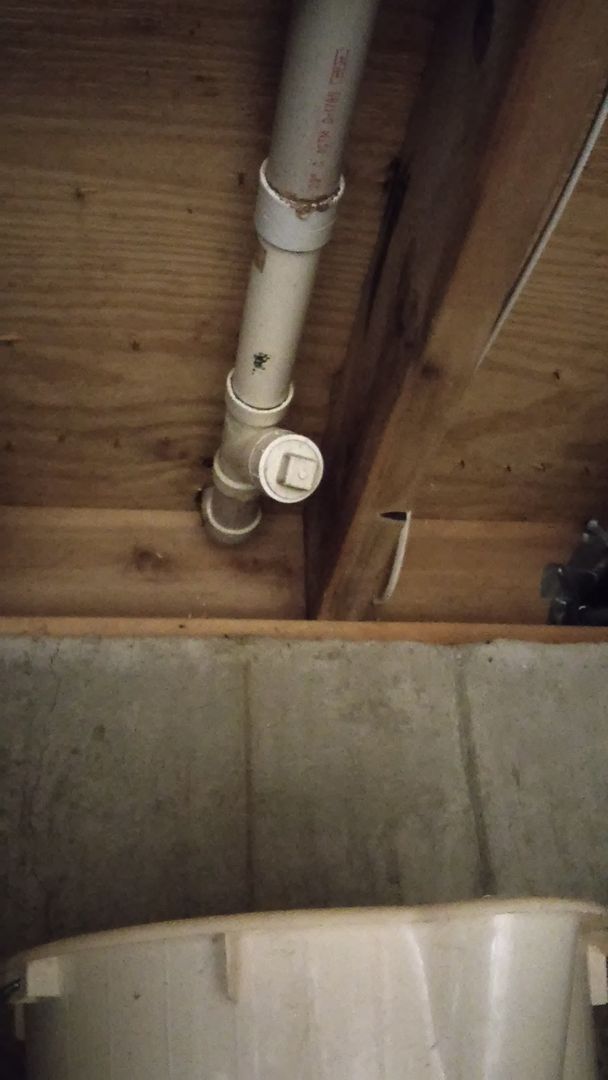
Well, the clog seems to have spontaneously dislodged itself overnight, but that still leaves the leaky pipe. It's leaking from around that ring near the top of the photo where all the brown gunk is. Is there some way of resealing that joint without cutting the whole thing up like RR wants to do? Duct tape?
Fenderputty
Banned
Man, that clog was tough to reach even with that clean out?
What size Pipe is that? Almost looks like pressure rated PVC being used for drainage. You should cut out that joint and make a new one. Duct tape will work for s short while if you want to get s new quote. You can call
That plumber back you trust that way at least. He's got nothing to snake now.
What size Pipe is that? Almost looks like pressure rated PVC being used for drainage. You should cut out that joint and make a new one. Duct tape will work for s short while if you want to get s new quote. You can call
That plumber back you trust that way at least. He's got nothing to snake now.
Well, the clog seems to have spontaneously dislodged itself overnight, but that still leaves the leaky pipe. It's leaking from around that ring near the top of the photo where all the brown gunk is. Is there some way of resealing that joint without cutting the whole thing up like RR wants to do? Duct tape?
I found this tip from Fine Homebuilding.
Alternately, after googling around, there is PVC pipe epoxy out there that you mix, paint over the leaks, and the wrap until it cures and forms a shell around the pipe, like a patch.
The best thing to do is to cut it and repair it. It's a very easy job, just a bit of pipe, a coupling and the PVC pipe adhesive. A trip to Ace/Home Depot and ~$10 will do it.
Fenderputty
Banned
I found this tip from Fine Homebuilding.
Alternately, after googling around, there is PVC pipe epoxy out there that you mix, paint over the leaks, and the wrap until it cures and forms a shell around the pipe, like a patch.
The best thing to do is to cut it and repair it. It's a very easy job, just a bit of pipe, a coupling and the PVC pipe adhesive. A trip to Ace/Home Depot and ~$10 will do it.
This is s nifty idea. If it works in a water supply it should work on drainage too.
Acrylic7
Member
After being kicked out of my old place I'm in a new spot and I finally got my new PC with Adobe CC and my old 21ux setup so I'm happy as can be, but there is something that bothers the crap out of me. I don't have my bookshelf.
I have enormous boxes of my favorite resources/ inspiration material and I cant access them while I'm trying to work and its a bit off putting not having them within arms reach. So I though I would trash this complete garbage ass media stand thing that's holding my old crt tv and replace it with a wooden bookshelf large enough to at least hold a fraction of my books.
I want to make it out of real wood and not buy another $25 dollar bookshelf because of how flimsy they are. Then I could just place a smaller flat screen on top later down the road.
I don't need it to be super expensive so I'm looking for some advice. My father was sort of a no-show so manly stuff like sawing and making fire out of water is a route best avoided. But on the flip side the countless hours spent drawing, playing video games on Fathers-day have crafted me into the crafty type so I'm pretty good at making stuff look good. I assume I just need wood, nails, wood glue and a hammer? I can work a power drill if need be. And when I need to saw something I can at least call him to do it for me.
Also going to try putting wheels on this fucker.
I sketched up a rough draft of how simplistic I want it to be. Basically just 8 wood pieces and 4 wheels.

Does anyone have any recommendations on what kind of wood I should get? I do plan on staining it. And if you could make any alterations what would that be? I just really need my books next to me.
RyanardoDaVinci
Member
You've got the right idea, it's really not that difficult to do.Does anyone have any recommendations on what kind of wood I should get? I do plan on staining it. And if you could make any alterations what would that be? I just really need my books next to me.
If you want it to look nice, don't get regular plywood but some nicer, smoother stuff; it's usually found in a separate aisle, not with the big 4'x8' sheets of ply. I built one that's very similar to yours and used plywood because it was all I had and I needed it quickly, and while it looks okay, it's very "rough" compared to what you would normally see.
If you're not comfortable with saws and stuff or don't have the tools, I think whatever place (Home Depot, Lowes) can cut things to size for you if you have the measurements.
A few additional suggestions.
Don't use nails, use screws. You can rent, borrow or buy a drill/screw gun for pretty cheap (once you have it, you'll use it a LOT). You'll want to pre-drill the side boards, and then screw directly into the plywood. Use 3/4" plywood all the way around, though you can use 1/4 on the back if you want; personally I'd use 3/4" but I tend to build stuff like a tank.
Home Depot and Lowes' will have some material you can use, but it will require sanding and finishing work on it, even with "A" grade surfacing. This is less of an issue if you are going to paint it. If you use plywood, look into edge banding to hide the layers on the edging; it's cheap and is applied with an iron.
If you want nicer material, such as pre-finished plywood or Baltic birch, look for a local lumber or hardwood store, not a home center. The big box places don't carry much quality material.
I also suggest watching a few videos on how frameless cabinets (as that's essentially what you are planning) are built for some tips on assembly and details. There are several ways to make them, but an hour or two on youtube and you should be all set.
I should also caution that this is one of those projects where it's easy to underestimate how difficult some things can be. You'll find yourself wanting clamps to hold it together as you build, a speed, combination or framing square to test for squareness, etc. I had a long learning curve on building stuff like this.
n64coder
Member
Well, the clog seems to have spontaneously dislodged itself overnight, but that still leaves the leaky pipe. It's leaking from around that ring near the top of the photo where all the brown gunk is. Is there some way of resealing that joint without cutting the whole thing up like RR wants to do? Duct tape?
Am I looking at the picture correctly? It looks like a floor joist, right? If so, is that cleanout pointing down towards the floor? If so, that's wrong. It should be parallel to the floor or otherwise stuff will collect in the cleanout, eventually clogging the pipe unless I'm looking at it wrong.
Am I looking at the picture correctly? It looks like a floor joist, right? If so, is that cleanout pointing down towards the floor? If so, that's wrong. It should be parallel to the floor or otherwise stuff will collect in the cleanout, eventually clogging the pipe unless I'm looking at it wrong.
That's what the RR plumber said too. I believe it's the original from when the house was built. He figured they put it in backwards because it was too close to the wall or something like that.
Neat. How do you even get started in repairing electronics? I have a set of PC speakers that I'd like to repair. It gets loud and soft on it own, which leads me to believe that it could be some power supply issue. I did some searching and found the circuit board schematics. Someone mentioned that the bridge rectifier is a common point of failure, and after measuring it, it does seem like it failed, so I might go replacing that. If that doesn't work, I don't know what else to look at.I don't have much advice for home repair but I'm into repairing old ghetto blaster boomboxes and other electronics.
I work in IT but I always feel much more accomplished getting old stuff like this working. I think troubleshooting the issue accurately is one of the most important parts. Being aware of what goes wrong with older stuff. If you're repairing old electronics the things to look for are universal:
-Rubber components withered away into goop
-Broken brittle plastic
-Failing capacitors
-Broken solder joints
-Corrosion
-Power supply issues (Also, fuses. You never know what a prior owner plugged into something so it's always good to check for a blown fuse)
Being able to track down and fix these things is doable for any laymen and you really don't need to know any advanced theory or anything to get a job done.
That said, if you truly want to fix old electronics and bring them into perfect working order you have to track down the service manual from the manufacturer. Sometimes you might even have to break down and buy a printout of a PDF on ebay or something because they can be incredibly difficult to track down and people use that opportunity to make money. Just recently I fixed some convergence issues on a K7000 arcade monitor even though I have no experience doing such a thing. I was able to read how they did it in the service manual and that was enough. It's not perfect yet but good for a first try.
Track down those service manuals!
I posted a separate thread for this, forgot all about this thread. I need to repair the wood in my couch.
http://m.neogaf.com/showthread.php?t=1058725
I went to Home Depot and I got 2 planks of wood to use to reinforce the broken planks. The guy at Home Depot told me to also use Liquid Nails to reinforce. That being said-I have no idea how to actually reinforce the split wooden planks or how to even use the Liquid Nails.
Help!
bennywhatever
Member
I posted a separate thread for this, forgot all about this thread. I need to repair the wood in my couch.
http://m.neogaf.com/showthread.php?t=1058725
I went to Home Depot and I got 2 planks of wood to use to reinforce the broken planks. The guy at Home Depot told me to also use Liquid Nails to reinforce. That being said-I have no idea how to actually reinforce the split wooden planks or how to even use the Liquid Nails.
Help!
I think you have a couple options.
1. Use some wood glue and duct tape. Glue them into place, and tape it to stay. Wait a day and remove the tape. This is kind of the ghetto option.
2. Use a piece of 1/4" plywood cut to the width of those beams and screw them flush with the beams.1/2" screws should work.. I don't know why the guy suggested liquid nails. Make sure you make the length of the plywood pretty long (about the length of the beam) - not just where the cracks are. As long as there's nothing sitting on the flat side of it, plywood is really strong at supporting things and 1/4" boards are really cheap.
The important thing is making sure the position of the original beams are exactly where they're supposed to be, since that's the way the furniture was designed.
So to be clear-I cut the plywood to the length of the split wood. I can lay it flush against the split wood, and should I put the Liquid Nails in between, and then flush them together, hold it with a quick grip over night to harden and then screw in 2 nails on each end to hold together? That should do it right?
My fiancée's grandpa and I are starting work on my front deck, and i have come to a painful and sudden realization: I absolutely loathe digging post holes. :-( And its not just the diameter of the post hole digger. I'm making them 10-12 inches across so we can make a little room for getting it perfectly square.
Three down, six more to go.
Three down, six more to go.
peppermints
Member
I have an HVAC question.
Our thermostat is directly above our TV in the living room. I never noticed it in the winter, but now that the AC is turned on it's kicking on cool way more than I would like.
My best guess is that it's because the heat generated from the TV (it's a plasma, so it gets pretty warm) is causing the thermostat to read warmer than it really is in that room or the rest of the ouse.
My wife is being pretty adamant that she doesn't want to rearrange the living room (it's situated currently so that we can keep an eye on our 1 year old on her playroom at all times), so moving the TV is a last resort, although it would be the easiest.
So my question is this:
Would it be a super difficult to move the thermostat to an adjacent wall? What all is involved? I installed the new thermostat myself, so I'm okay with dealing with the wiring from the furnace to it.
Or is there a way that I could possibly deflect the heat from the TV to not hit the thermostat?
My fiancée's grandpa and I are starting work on my front deck, and i have come to a painful and sudden realization: I absolutely loathe digging post holes. :-( And its not just the diameter of the post hole digger. I'm making them 10-12 inches across so we can make a little room for getting it perfectly square.
Three down, six more to go.
This is going to be me in a week or two. I'm heading in tomorrow or Wednesday for my (hopefully) final plan review with the building inspector. Once I have the permit, I start marking out and digging holes. Lots of them, all 12 inches in diameter. Lots of rock in this area. I've done it for a sewer line I replaced two years ago, and again for the shed last summer.
It's not fun. It sucks that the least enjoyable part of the project is also one of the first, but after that, the construction should hopefully be more fun. (I do them by hand.)
So to be clear-I cut the plywood to the length of the split wood. I can lay it flush against the split wood, and should I put the Liquid Nails in between, and then flush them together, hold it with a quick grip over night to harden and then screw in 2 nails on each end to hold together? That should do it right?
Use plywood if you want to do it again in one week. Use steel angle instead, and screws instead of nails and glue, should last longer than anything else on that sofa
http://www.homedepot.com/p/Unbrande...n-x-1-8-in-Plain-Steel-Angle-800897/204225745
I have an HVAC question.
Thermostat is just a big switch. So if you are comfortable with digging a new hole on the wall, ducting the wire through, covering the old hole, really not a big deal. Otherwise, you can use a thermostat with remote temperature sensor, or, get a small fan aiming at the thermostat and the back of the TV.
Use plywood if you want to do it again in one week. Use steel angle instead, and screws instead of nails and glue, should last longer than anything else on that sofa
http://www.homedepot.com/p/Unbrande...n-x-1-8-in-Plain-Steel-Angle-800897/204225745
Now you tell me.
Fenderputty
Banned
Am I looking at the picture correctly? It looks like a floor joist, right? If so, is that cleanout pointing down towards the floor? If so, that's wrong. It should be parallel to the floor or otherwise stuff will collect in the cleanout, eventually clogging the pipe unless I'm looking at it wrong.
Haha holy shit how did I miss that.
The clean out would have to move entirely assuming he can't cut a hole in the floor above him.
We're going to start installing vinyl planks in the basement this week. Trying to decide on a moisture barrier and wondering if we should get every trace of carpet glue up before we put the floor down. Would felt tar paper work as a moisture barrier? I don't know if it would allow the floor to breathe enough to prevent mold. We have a lot of it, and if it works we are ready to go. My primary goal is to prevent mold and musty smell in the basement. I wonder if leaving small patches of glue will cause problems later due to small carpet fibers that may still be stuck to them.
n64coder
Member
I absolutely loathe digging post holes. :-( And its not just the diameter of the post hole digger. I'm making them 10-12 inches across so we can make a little room for getting it perfectly square.
I don't blame you. Where are you located? Are you encountering a lot of rocks? In New England, there always seem to be a large rock wherever you want to dig a hole. Two summers ago, I had to dig out a 20x16 area for my shed because the difference in grade was 3 ft from one corner to the other. Uggh, hated every minute of it.
We're going to start installing vinyl planks in the basement this week. Trying to decide on a moisture barrier and wondering if we should get every trace of carpet glue up before we put the floor down. Would felt tar paper work as a moisture barrier? I don't know if it would allow the floor to breathe enough to prevent mold. We have a lot of it, and if it works we are ready to go. My primary goal is to prevent mold and musty smell in the basement. I wonder if leaving small patches of glue will cause problems later due to small carpet fibers that may still be stuck to them.
I'm not an expert on this but I would ensure that the floor is mostly level and I know that some floors have this thin foam stuff you put underneath the floor to act as padding and I think it would be sufficient to cover the glue. I would also not bother putting a moisture barrier down and instead, plan to run a dehumidifier during the humid months.
My wife is being pretty adamant that she doesn't want to rearrange the living room (it's situated currently so that we can keep an eye on our 1 year old on her playroom at all times), so moving the TV is a last resort, although it would be the easiest.
So my question is this:
Would it be a super difficult to move the thermostat to an adjacent wall? What all is involved? I installed the new thermostat myself, so I'm okay with dealing with the wiring from the furnace to it.
Or is there a way that I could possibly deflect the heat from the TV to not hit the thermostat?
Where is the TV located? Is it on the first floor and you have access to the basement below? If so, it would be easy to move. Is the wall an interior wall (usually thermostats are not on exterior walls)? If the room is on the second floor or you have access to an attic above the room, you can also extend the wire to a different wall from above. Just put in a receptacle box with a cover plate where you make the splice.
Another option is to put in a wireless thermostat. You put in a special module on furnace that communicates with a wireless thermostat.
Manufacturer recommends a moisture barrier to protect whatever sits on top of the vinyl. Roofing paper is much cheaper than 2-in-1 foam underlayerment (~$0.04/sq ft vs $0.24/sq ft). It doesn't cushion anything (I have a couple of creaky hardwood boards that attest to that), but it allows cash to go elsewhere, into more visible improvements. I know it is impossible to totally avoid mold but I'd like to take as much precaution as I can. My old house had mold so bad it came up in billows whenever a window slid up. It was in the walls, the floor, the door frames. I have very little risk of that happening again but I still want to prevent as much as possible.I'm not an expert on this but I would ensure that the floor is mostly level and I know that some floors have this thin foam stuff you put underneath the floor to act as padding and I think it would be sufficient to cover the glue. I would also not bother putting a moisture barrier down and instead, plan to run a dehumidifier during the humid months.
Dehumidifier has been running 24/7 for over a month. I need to empty it twice a day. We started the central air up a couple of days ago so I hope some of the humidity clears up. We put a new thermostat in with a humidity readout and it said the upstairs humidity was at 79%. You can feel how thick the air is in the basement, so I imagine, down there, humidity is even higher.
Our basement floor is not completely level. There is ~1/4-1/2 in. dip on one of the slabs. I would not have noticed this if the basement hadn't flooded and the water pooled to that spot. I don't think it is enough of a grade to cause problems with the vinyl.
bennywhatever
Member
My fiancée's grandpa and I are starting work on my front deck, and i have come to a painful and sudden realization: I absolutely loathe digging post holes. :-( And its not just the diameter of the post hole digger. I'm making them 10-12 inches across so we can make a little room for getting it perfectly square.
Three down, six more to go.
Yeah, it's no fun. I dug 18 holes (12" wide, 30" deep) when I built my fence last year using a post hole digger and a slim shovel. Took me two whole days of doing just that and resting.
The worst is whenever you hit an un-marked line of some sort, and you freak out because you know it's important but it wasn't marked. I hit a WOW Internet line that was unmarked. It didn't affect anyone, so I ignored it. Then we switched to WOW a few months ago and they had to rerun the whole thing.
But anyways, yeah, Post Holes stink. I've heard renting an Auger is ideal for it.
sir_kevith
Member
Neat. How do you even get started in repairing electronics? I have a set of PC speakers that I'd like to repair. It gets loud and soft on it own, which leads me to believe that it could be some power supply issue. I did some searching and found the circuit board schematics. Someone mentioned that the bridge rectifier is a common point of failure, and after measuring it, it does seem like it failed, so I might go replacing that. If that doesn't work, I don't know what else to look at.
First thing I'd try with PC speakers is a few different sources. Sometimes there's settings in Windows or some audio software messing with the sound levels. If you try a phone/mp3 player and it still does it, then it's probably the hardware. You can also try a different power supply if you want to narrow it down further. Just look and see if you have another device around the house with an adapter with the same polarity and voltage/amp or really close.
I've never had a pair of those speakers that's worth repairing on my own so I haven't had issues with a bridge rectifier before. Looks like you could simply bypass the bridge rectifier and run the things off 9V batteries if you wanted to further test if that's the part that's failing:
http://www.instructables.com/id/Convert-a-Genius-speaker-to-run-on-9-volt-baterys/
If you have to replace it, you'll need a soldering iron and find a new bridge. If you've never done that before I say to just buy the stuff and practice a bit on some simple circuit boards. It's basically miniature welding. Even if the speakers never work again it's still worth trying to learn a new skill so I say goto town and buy an iron, solder, multimeter, a basic kit with some wire strippers and joiners and stuff. It's probably gonna cost more than the speakers but in the end you will have a new skill.
Neat. How do you even get started in repairing electronics? I have a set of PC speakers that I'd like to repair. It gets loud and soft on it own, which leads me to believe that it could be some power supply issue. I did some searching and found the circuit board schematics. Someone mentioned that the bridge rectifier is a common point of failure, and after measuring it, it does seem like it failed, so I might go replacing that. If that doesn't work, I don't know what else to look at.
90% of speaker problems are due to this guy, the potentiometer, i.e., the knob. I will start from there. If the p/s failed, you most likely won't get sound at all.

sir_kevith
Member
90% of speaker problems are due to this guy, the potentiometer, i.e., the knob. I will start from there. If the p/s failed, you most likely won't get sound at all.
Yes, also always a good idea to check the stereo plug too on a pair of computer speakers.
Fenderputty
Banned
We're going to start installing vinyl planks in the basement this week. Trying to decide on a moisture barrier and wondering if we should get every trace of carpet glue up before we put the floor down. Would felt tar paper work as a moisture barrier? I don't know if it would allow the floor to breathe enough to prevent mold. We have a lot of it, and if it works we are ready to go. My primary goal is to prevent mold and musty smell in the basement. I wonder if leaving small patches of glue will cause problems later due to small carpet fibers that may still be stuck to them.
Redgard? We used it in our shower space. They use it on job sites we're on a lot as well.
http://www.homedepot.com/p/Custom-B...nd-Crack-Prevention-Membrane-LQWAF1/100169081
Be warned .... use a mask when applying. Not some shitty paper mask either. Like get the one with canisters on both sides of your face. Lung stinging vapor.
n64coder
Member
Dehumidifier has been running 24/7 for over a month. I need to empty it twice a day.
One recommendation I have is to get a condensate pump.

You run a hose from your dehumidifier to your condensate pump. From there, you run some tubing from the pump to outside unless you have a sump pit & pump. This way, you never to empty the bucket.
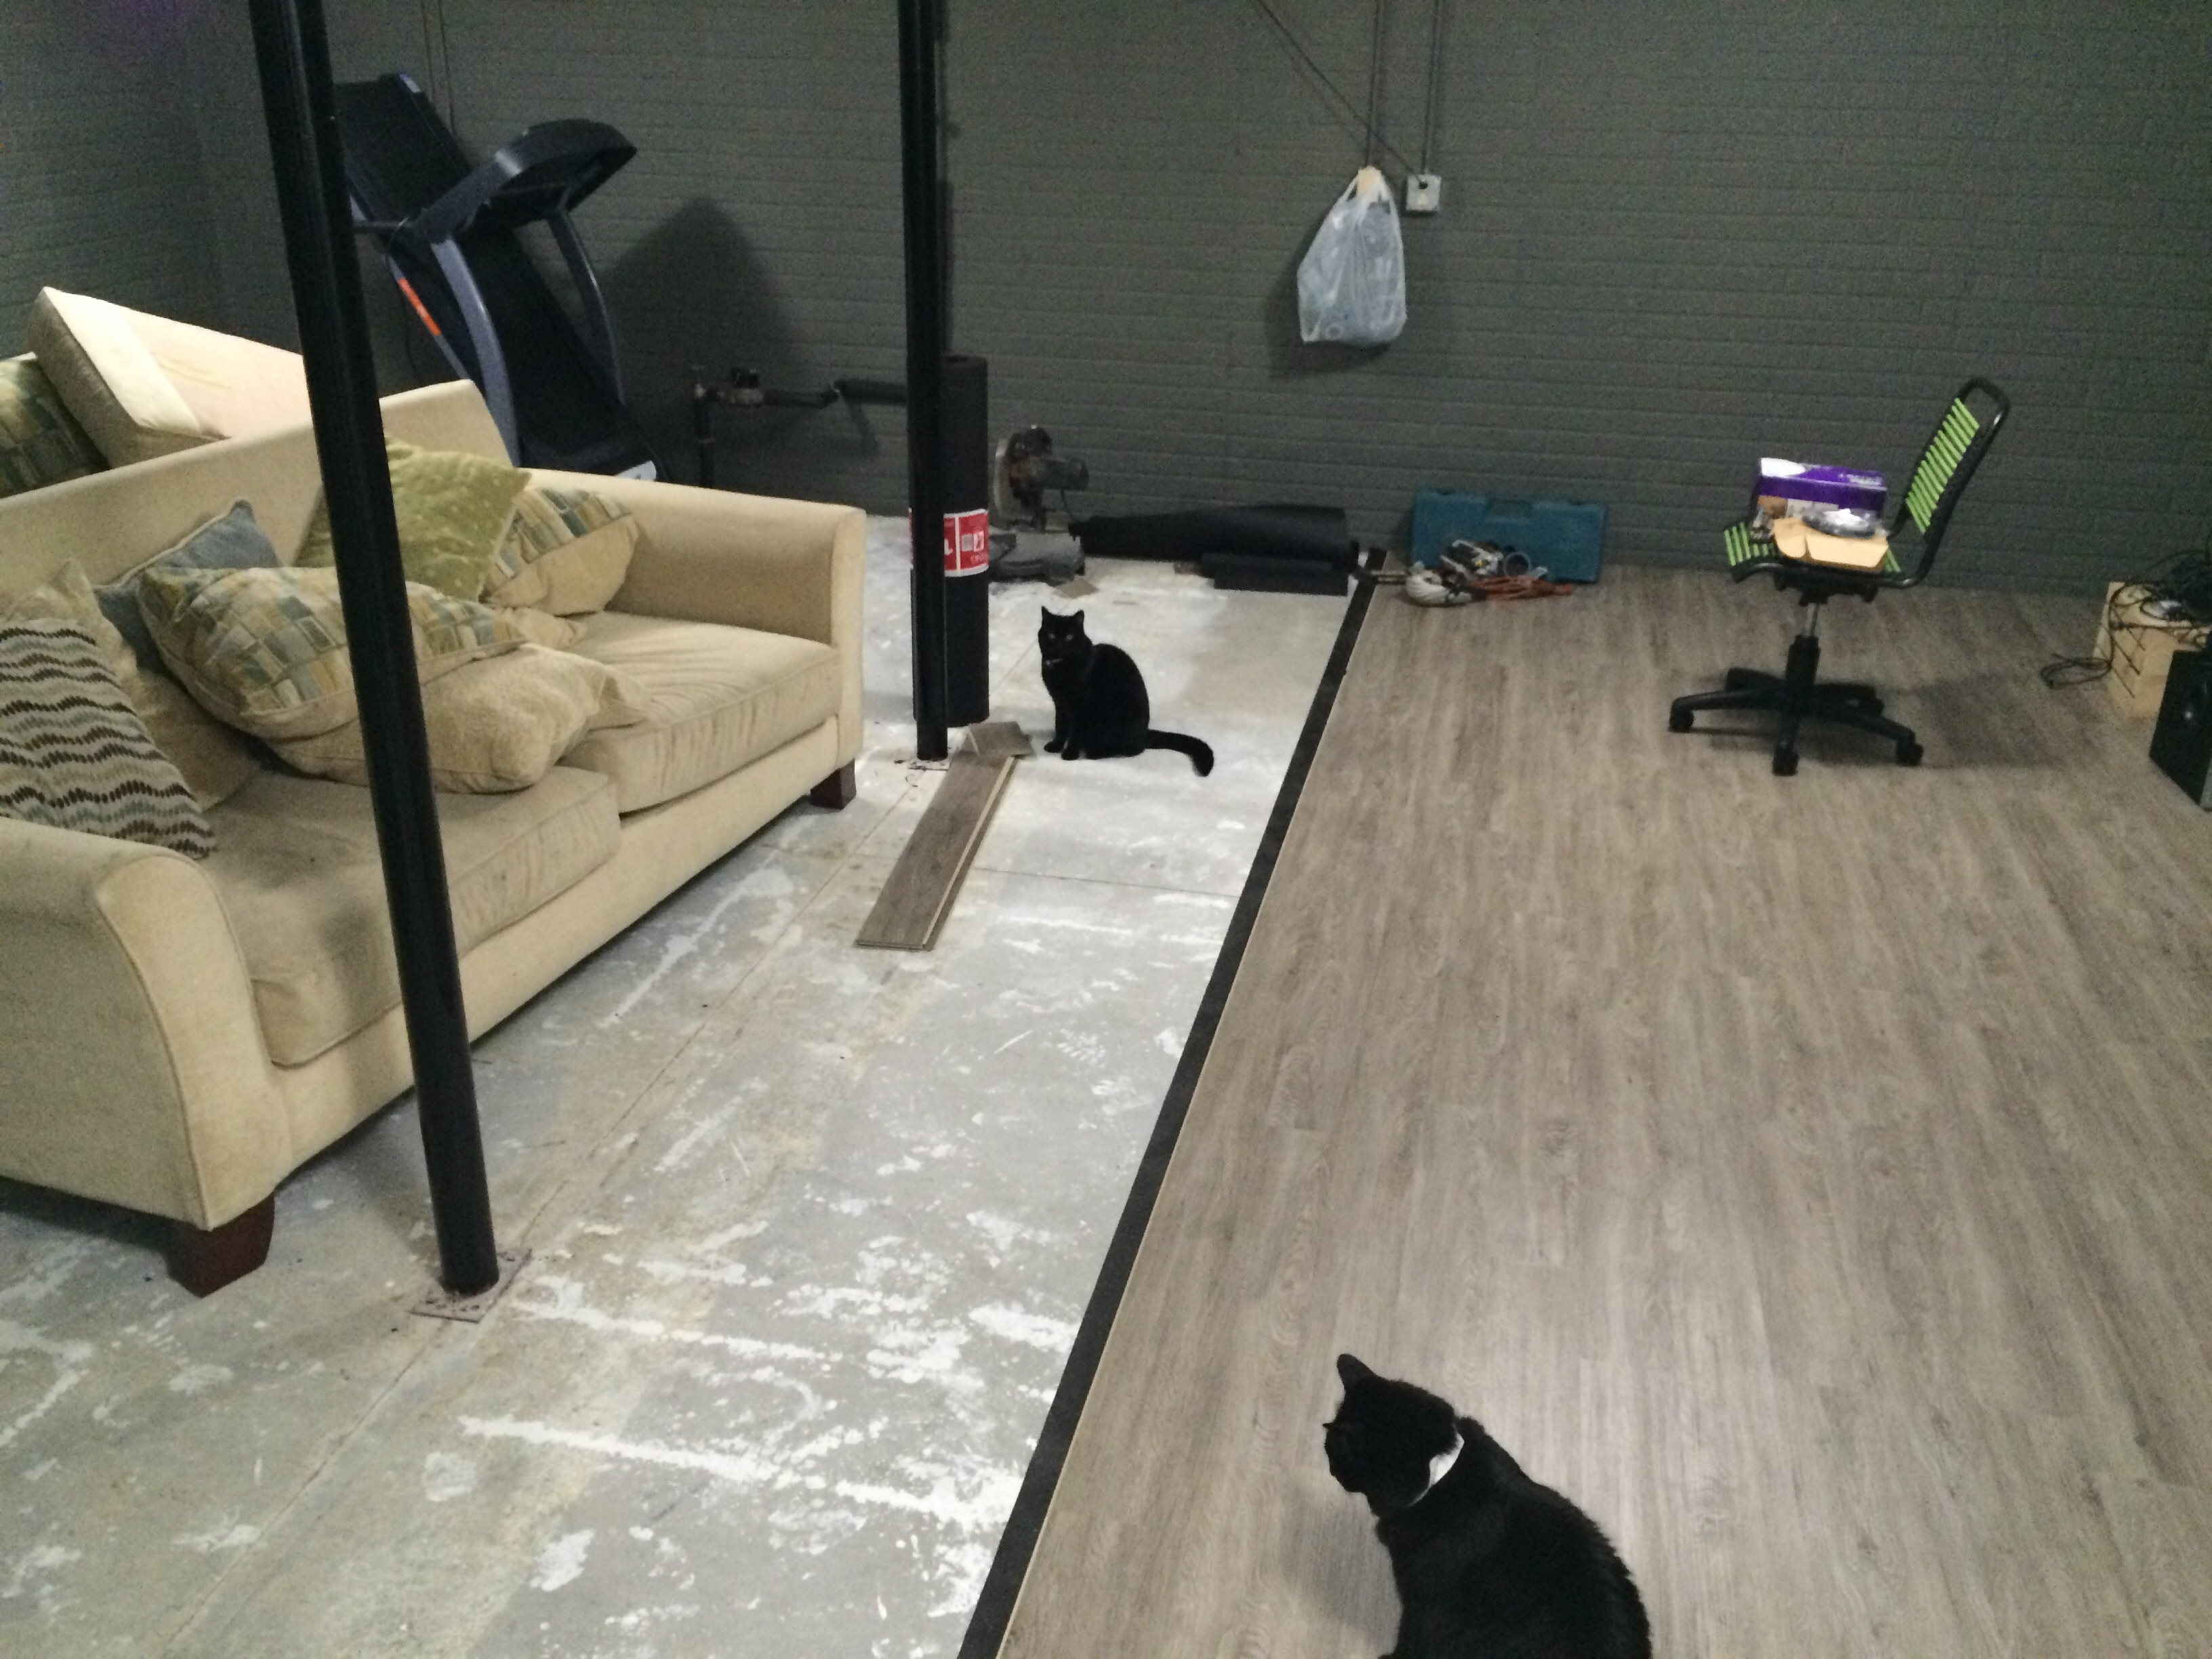
My father-in-law has been extremely generous with his time since the beginning of this project, and I came home from work today to find he already started the basement flooring. My wife and I had our last prenatal class tonight. By the time we got home he had finished 30% of the floor. Before and after:
I realize this is not fully in the spirit of DIY, but I wanted to share.
I realize this is not fully in the spirit of DIY, but I wanted to share.
Is there a way to regrade the landscaping so that water slopes away from the house? That would be the ideal way. Do you have a picture of the area that you can post?
Thank you for your interest. I may have to just settle for sloping the side of my house, as my gate is literally just a few feet wide.
http://img.photobucket.com/albums/v429/LakeEarth/IMG_2501.jpg
Mine's on the left. You can tell it slopes right to my new house. The lack of grass is due to a cracked foundation that was fixed a few months back.
That is a tough situation. Ideally you would be able to build up a small slope along your foundation, so water drains at least a foot or two away form the foundation wall. That's complicated by the gate at the back of the house. (It's a very similar situation to my house, though we have an extra ~10 feet between properties.)
Honestly, I'd give a call to your local building department and ask what the code is for that kind of clustered housing. The code is proscriptive about it, and they may have some suggestions on what to do in order to get proper drainage. I've found my local building department to be pretty helpful with stuff like this. It's worth asking.
Antiwhippy
the holder of the trombone
Finally completed my headphone DIY project. My AKG K551's cables splitted because they were terrible, thin cables, and while they did worked fine, the split kept bothering me and I also didn't like how short they were. So I decided to mod it to have a removable cable port because I also wanted to have a fun soldering DIY project for awhile now to teach myself soldering.
Bought the audio jack part from ebay, had to do some cable stripping and filing to get it fitted, wire it up properly and then solder it. Obviously the headphone didn't come out of it without some battle scars but it works! So I'm happy with it.


Bought the audio jack part from ebay, had to do some cable stripping and filing to get it fitted, wire it up properly and then solder it. Obviously the headphone didn't come out of it without some battle scars but it works! So I'm happy with it.
Fenderputty
Banned
Well time to drop some pictures of my work. Things I did:
- Removed Popcorn Ceiling
- Pulled 4 new electrical Circuits (Oven and other appliances, lighting, outlets)
- Ran all new down lights in main room (All LED with exception of ceiling fans.)
- Ran new ceiling fans to all bedrooms.
- Ran 4 new switch legs so fan and lights are separate and controlled on the wall.
- Demo'ed Wall
- Demo'ed Bathroom
- Took out wood floors in front room
- Moved Gas line down wall for new cooktop area
- moved plumbing down wall for new icemaker box / fridge connection
- saw cut power into slab for power to new kitchen island
- re-plumbed new shower valve and stubbed out shower head to 7'
- Set new tub
- Tiled Shower, Bathroom Floors and Kitchen Backslash
- Crown Molding in Front Room
- New Base in every room
- New casing on every window
- Paint
- Reinstalled wood floors Floors in front room
- Shoe Molding around cabinets
- Set appliances
- All finished plumbing
Things I didn't do:
- Build and paint cabinets
- Tape and texture ceiling I stripped popcorn off of
- Tape and patch walls
- Took out and cut in different window / stucco work on exterior
Pictures of the before. You can orient yourself by using the 4 windows in the top front of the main room.
Pictures of some during (Not in order of occurrence):
Some after pics:
I'm tired ...
- Removed Popcorn Ceiling
- Pulled 4 new electrical Circuits (Oven and other appliances, lighting, outlets)
- Ran all new down lights in main room (All LED with exception of ceiling fans.)
- Ran new ceiling fans to all bedrooms.
- Ran 4 new switch legs so fan and lights are separate and controlled on the wall.
- Demo'ed Wall
- Demo'ed Bathroom
- Took out wood floors in front room
- Moved Gas line down wall for new cooktop area
- moved plumbing down wall for new icemaker box / fridge connection
- saw cut power into slab for power to new kitchen island
- re-plumbed new shower valve and stubbed out shower head to 7'
- Set new tub
- Tiled Shower, Bathroom Floors and Kitchen Backslash
- Crown Molding in Front Room
- New Base in every room
- New casing on every window
- Paint
- Reinstalled wood floors Floors in front room
- Shoe Molding around cabinets
- Set appliances
- All finished plumbing
Things I didn't do:
- Build and paint cabinets
- Tape and texture ceiling I stripped popcorn off of
- Tape and patch walls
- Took out and cut in different window / stucco work on exterior
Pictures of the before. You can orient yourself by using the 4 windows in the top front of the main room.


Pictures of some during (Not in order of occurrence):


Some after pics:


I'm tired ...
Well time to drop some pictures of my work. Things I did:
- Removed Popcorn Ceiling
- Pulled 4 new electrical Circuits (Oven and other appliances, lighting, outlets)
- Ran all new down lights in main room (All LED with exception of ceiling fans.)
- Ran new ceiling fans to all bedrooms.
- Ran 4 new switch legs so fan and lights are separate and controlled on the wall.
- Demo'ed Wall
- Demo'ed Bathroom
- Took out wood floors in front room
- Moved Gas line down wall for new cooktop area
- moved plumbing down wall for new icemaker box / fridge connection
- saw cut power into slab for power to new kitchen island
- re-plumbed new shower valve and stubbed out shower head to 7'
- Set new tub
- Tiled Shower, Bathroom Floors and Kitchen Backslash
- Crown Molding in Front Room
- New Base in every room
- New casing on every window
- Paint
- Reinstalled wood floors Floors in front room
- Shoe Molding around cabinets
- Set appliances
- All finished plumbing
Things I didn't do:
- Build and paint cabinets
- Tape and texture ceiling I stripped popcorn off of
- Tape and patch walls
- Took out and cut in different window / stucco work on exterior
Pictures of the before. You can orient yourself by using the 4 windows in the top front of the main room.
Tremendous work! A few questions for you -
- How much experience did you have going into those projects? Some of our rooms need a lot of updating, and I have moderate experience at this point with most tasks, but I'm learning to draw the line at various points. I wouldn't touch the gas line myself, for example.
- Was this all permitted work? I'm building a new deck this summer and after two drafts just got the okay from the building inspector on the plan; I'm applying for the permit tomorrow. What kind of work went into coordinating with them? Especially around taking out walls and doing the electrical and plumbing.
- How long did that all take? Looks like at least six months, probably more.
- Where you living there at the time?
Fenderputty
Banned
Tremendous work! A few questions for you -
- How much experience did you have going into those projects? Some of our rooms need a lot of updating, and I have moderate experience at this point with most tasks, but I'm learning to draw the line at various points. I wouldn't touch the gas line myself, for example.
- Was this all permitted work? I'm building a new deck this summer and after two drafts just got the okay from the building inspector on the plan; I'm applying for the permit tomorrow. What kind of work went into coordinating with them? Especially around taking out walls and doing the electrical and plumbing.
- How long did that all take? Looks like at least six months, probably more.
- Where you living there at the time?
Firstly, thanks for the compliment. This is my first remodel of my own and beyond family/friends, GAF will likely be the only place I show my work.
I have spotty experience with a lot of fields, but I'm pretty novice for the experience I have. My father is an electrician, his father a carpenter, his uncle a tile guy. I've been involved in building my father's current home from the ground up and, I've been involved in pretty much every DIY my pops did since I was young. I also work around construction so I can see other fields work. That's how I new about redgard water sealant for example.
I have had no experience with gas lines myself. It's one of the easier things I did though. People are intimidated by electrical and gas because they can potentially kill, but with some basic knowledge they're both fine for DIY. The gas line is simple black pipe. The threaded joints are sealed using yellow gas pipe dope. You screw the pipe together and make sure the dope is on the male threaded ends. After the connection is made you can turn the gas back on at the house and check for leaks. You check for leaks using simple dish soap. Put some around the joint and look for bubbles. With electrical the safest bet is to turn off the circuit at the board prior to work. Make sure you also have a voltage tester or a tick tracer to confirm if a line is hot or not.
None of the work needed permits. The wall I took down was not structural and the gas line ran along the base of it. Remodel stuff doesn't really neeed much permitting unless major structural changes are going to happen. Even the electrical I added didn't need a permit since I was able to use my same breaker board (100A panel). Had I needed to increase my panel size I would have had to call Edison out and would have needed a permit. I will need a permit for a room addition I would like to do some time next year.
In total about 5 months. I touched every room but the master bath (i'm broke now lol). I did work on nights after I got home from my employer and also on the weekends. This has pretty much consumed me. My wife and I have both had moments where stress got to us, we freaked out a little (or a lot), and then we moved on.
I'm lucky enough to have parents with a very large and empty house. We moved back into my families after I sold last summer to house hunt, buy and remodel. If I did not have my family, I would have had to do one room at a time, slowly. It probably would have taken me over a year like that.
EDIT:
I'm also lucky to have a crafty wife who's not intimidated by "man's work". She did a good portion of the casing and base and almost all of the shoe molding. I taught her how to use the table saw and miter saw. She helped me grout, paint and do most everything. Had I done this alone ... 2-3 more months lol.
Fenderputty
Banned
A lot of work has already gone into it, and I'm still really at the beginning lol.
Yeah ... until you get to the finish work, a lot of what you do will feel under appreciated so to speak. A lot of the enjoyment I get from DIY is seeing the results of what I've done. Framing is a huge job and is the backbone of your structure. Similarly, the electrical backbone I pulled for new lights and appliances is one of the things i'm most proud of, but also one of the things I did that's most looked over.
I saw this thread pop up to the front page of offtopic and thought it'd be the best place to share this.
Over the last 9 months, I've helped lead a project to turn this:

into this:

(a Makerspace for South London)
All done by our members and volunteers.
All sorts of jobs involved. Demolitions:

Blockwork:

Flooring:

Joinery:

Glazing:

Still loads to do, but "finished" enough for people to use as a workshop. Very proud of what we've managed to achieve")
I just wish I was doing this 3 years ago when I wasn't a father
Over the last 9 months, I've helped lead a project to turn this:
into this:
(a Makerspace for South London)
All done by our members and volunteers.
All sorts of jobs involved. Demolitions:
Blockwork:
Flooring:
Joinery:
Glazing:
Still loads to do, but "finished" enough for people to use as a workshop. Very proud of what we've managed to achieve
I just wish I was doing this 3 years ago when I wasn't a father
Yeah ... until you get to the finish work, a lot of what you do will feel under appreciated so to speak. A lot of the enjoyment I get from DIY is seeing the results of what I've done. Framing is a huge job and is the backbone of your structure. Similarly, the electrical backbone I pulled for new lights and appliances is one of the things i'm most proud of, but also one of the things I did that's most looked over.
When you pulled the new lines, were you opening up the walls to run the new cable? Curious about what goes into that kind of work.
I have an older home - build in 1940 - and it has renovations done at different periods of time. One of the issues I've wanted to take care of is switching a number of our outlets from 2 prong to 3; these were wired probably 30 years ago. But I'm assuming we'd have to open up our (lath and plaster) walls to run new cable, which it probably could use, so I haven't gone there.
Fenderputty
Banned
When you pulled the new lines, were you opening up the walls to run the new cable? Curious about what goes into that kind of work.
I have an older home - build in 1940 - and it has renovations done at different periods of time. One of the issues I've wanted to take care of is switching a number of our outlets from 2 prong to 3; these were wired probably 30 years ago. But I'm assuming we'd have to open up our (lath and plaster) walls to run new cable, which it probably could use, so I haven't gone there.
I had an attic with about 3' of space above my front room and about 6-7' of clearance for the rest of the house. You'll note a picture in my post with the ladder and a bunch of cables coming out of the hole I cut in the wall. If you don't have attic space you're forced to remove wall and patch. I did a combo here. I was in the attic pushing wire while my friend was on the ladder pulling down.
The real big challenge is fire stops in your stud banks. If you have an attic you can get a 6 foot long drillbit made to drill through fire stops. Then you fish pull wire down, try and make it through your drilled hole so you can pull a new run up.
If you have no attic space, walls need to be pulled. A raised foundation could help, but it's not ideal as you cannot get a 6' bit into a 2'crawl space.
Are you replacing old receptacles? Code issues?
Edit:
If it's just receptacles get a GFCI receptacle and replace your fist receptcle in the circuit with it. Every receptcle after could be standard 3 prong IIRC.
Fenderputty
Banned
Cool Hanger project btw
Railway archHanger
(It's basically a cave made out of 150-year-old bricks)